A beginner tutorial describing from beginning to end how to set up a three page website with a dynamic contact list combined with a detail page, the finished project is included for study.
This tutorial covers: Defining the site, building a page and copying it, setting up a quick Database, creating the connection, using the dynamic data and creating a detail page in full detail, no live objects here.
This tutorial is compatible with Dreamweaver MX, in MX the databindings panel is upgraded to what is now the Application panel.
Building a basic
site with Contact page
Part 3: Using
Dynamic data
Now where do we
put this info, obviously in the center cell, but we need to add another table
in there or we can't use repeat region to show more than one entry, so click
in the center cell and press CTRL + ALT + T, or menu insert ->
table, give it 2 rows and 4 columns.
Hey, wait a minute,
4 columns ? but I have 6 fields, i know, i know... You will see why i use 4
;-)
I gave it a border
of 1 this time, so we can see where cells end, easier reading data. Give the
top row the names for the data that will be displayed, from left to right i
used:
First Name
Last Name
Position
Email Link
For decoration
i made the text bold and white and gave the toprow a blue background color using
the the call background colour picking, offcourse i first selected the whole
row by moving my mouse to the LEFT edge and when the pointer changes to a arrow
pointing to the right do a click and the whole row is selected.
(Always do complete row selecting by clicking the left border and a complete
column by clicking the top border !)
Now we're going
to tell it what data goes where, we can do this in a few ways, i will explain
2 ways for you:
Dragging the
data in:
This technique is probably the easiest, but could result in data being in the
wrong places... We open our recordsets data in the databinding window by clicking
the + sign next to it, there are our fields with data, now click on the FirstName
entry and keep the mousebutton pressed, DRAG the data into the document, move
your pointer so that it is hovering inside the cell below our Blue first name
cell and release the mouse button, after 1 second of thinking the value will
show up, in my case (rsTutContact.Fields.Item("FirstName").Value).
Binding the
data into a place:
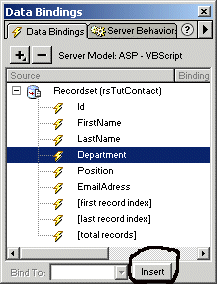
This is my favorite, you click where you want the data, effectively leaving
the cursor there, in this case the last name cell (or first name if you still
have 4 empty cells), with your blinking cursor in the last name cell move the
mousepointer to the databinding window and select Last name, by clicking once
on it, then click on the small insert button on the rightbottom of the databinding
window (note, to remove dynamic data and behaviors always use the panels,
never select a repeat region or dynamic value and press delete, this will leave
unnecesary codes and could cause strange errors, select the value in the server
behaviors window and click the - button.). After pressing insert the value
should popup again in the rightplace in a second, maybe longer depending on
your system speed and the dynamic data you are inserting and/or applying.
(On my Athlon 1200, it is almost instant, it starts to noticably slow a little
when i turn live data on, or when i am working with 26 queries, which i did
once... A real pain updating that page in UDev.)
But at our company, where we use NT workstations this can take a few seconds.
Adding our other
entries and making a dynamic link:
So now we have 2 dynamic entries, let's add the other two, click in the position
cell and bind position into it, then click in email link and bind the Department
data into it (surprised ? are you really surprised ? I saw this used plenty
of times and i use it myself, i only use UserName for this trick...) Now before
we forget let's deal with that email link first !
Click once on the
dynamic entry that reads something like (rsTutContact.Fields.Item("Department").Value).
With the value selected we click on the folder icon next to the Link field in
the properties panel (i hear you thinking are we linking this to a page ? No,
we're not...but if our emailadress was a location we could make it do that,
we can also use these file locations for dynamic images/rollover images, etc.)
at the top of this screen you will see two possible selections with a line that
reads "Select filename from" we are going to changes it from filesystem
to datasources and our data shows up again, click on emailadress and watch what
happens to the url field, it's our value, we are going to put "mailto:"
in front of that so that it becomes : mailto:<%=(rsTutContact.Fields.Item("EmailAdress").Value)%>
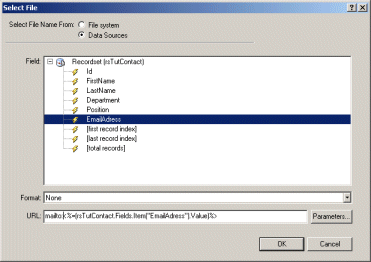
As before, we can add a subject field if we wish, but in this case i purposely
do NOT do that. (I don't want our kpn guide to do that either if i'm looking
for a email link to someone from our intranet or computer support department,
so i won't do it either.) Click on ok and go to the following menu: Edit
-> Preferences, click on the Preview in Browser panel and make
SURE that preview using Application server is checked
(turned on), this is easy to forget...(If you get errors you can't figure
out, go here to see if it's checked, i once looked for hours after making a
new site cause i kept getting the same error and i couldn't find what it was,
not on the Macromedia site, not on the Microsoft site and then someone in the
MM forum suggested i check that option and it wasn't checked for some reason
!), ok this screen.
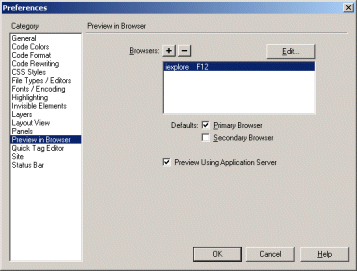
if you made sure
it is checked then press the button on the leftside of the title field (which
we still have to change) , the one with the lightning bolt on it (live data
button), this will put you in preview mode and will access your application
server (PWS or IIS or any other application server you might be running).
If I explained
everything as i should have, then you should have something resembling this:
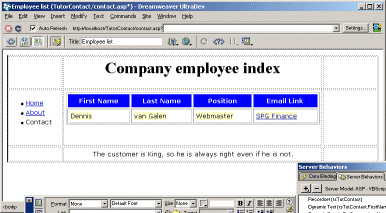
Well, lookie there,
that's me !
And I do work for the SPG finance department as their webmaster ;-)
Repeating regions:
ok, so where's the rest of my list ?
Well, i didn't tell it that i wanted to see more then just one entry, now did
i ?
No, so i'll do
that now, and that is probably one of the easiest things in this whole tutorial,
we select the row with dynamic values, move the mousepointer to the left edge
of the table and if it changes then we click and see those black lines show
up again.
Now we're going
to add a server behavior to that region of dynamic data.
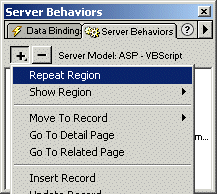
In the data Bindings window click on the server behaviors tab and click the
+ icon (add server behavior) and select the first in the list, repeat region.
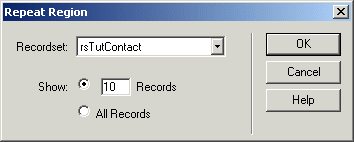
Then pops up a
requester asking what we want to repeat and how many times it should repeat,
in our case there's only 1 Query and 4 entries (for me atleast), so we could
just ok it, but this is used if more entries are returned and lists tend to
grow very long... You can have some control over how often it repeats, i usually
use 10 or 25, it depends on my font used too and other variables on the page
which i have to take into account.
In this tutorial
i changed it to all, it didn't matter cause default is 10 so a ok in the requester
is sufficient for this tutorial.
Now that we told
the requester that we agree to these settings (press ok ;-) ) we can switch
to live data mode again and see all our employees appear.
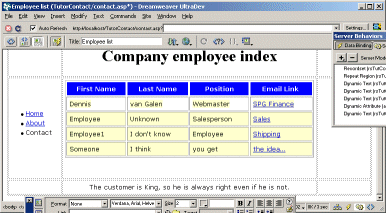
Hmmm, this is a
dubious company, a salesperson with a unknown last name, the personel department
doesn't know the last name of the guy that handles the shipping ?
I'm not sure if i want to shop there...
Our website is
finished, we can make this list into one that shows more data on all employess
by either adding more fields to this dbase table, or create a seperate table
for detailed information, the easier way is setting up the additional fields
in this table, because then we could...
goto
Part 4


 Dennis started his career as order picker in warehouses. In the past 10 years he did alot of data-entry work for Government agencies and around the age of 20 he helped clean the KPN Telecom customer databases. At the age of 27 Dennis returned to KPN Telecom where he was a full time webmaster / webdeveloper. In his spare time he used to be a voluntary Manager for DMXzone.com. After leaving KPN in 2012 Dennis worked for Tevreden.nl on webbased customer satisfaction platforms.
Comments
Fantastic!
Marvellous
Well done. This tutorial sets an excellent benchmark to be lived up to. I am going to brush up my efforts as this tute is making mine look bad!
R
RE: Marvellous
Is it really that good ?
I tried writing this as detailed and understandable as possible.
I think I succeeded :-)
Dennis
Recommended Reading
You must me logged in to write a comment.