Tutorial for PureASP upload extension... It's easy...
Pure ASP Upload Tutorial by Leon Radley
This is a tutorial in 6 steps on George Petrov's PureASPupload extension by
Leon Radley
This tutorial is on how to upload a file into a folder on the server without
any dlls just some good old fashioned ASP coding.
It's quite simple to use, the only thing is that you have to do the procedure
in a certain way to get it to work,
and not change anything afterwards because that makes a mess of the code and
it sometimes contributes to errors.
Start:
Create a new page and name it upload.asp, a good place to put it is in your
Personal Web Server (You know if you have it)
Step 1: Create a Connection to a database (if your not
interested in inserting the other fields into a database jump to step: 6).
Here is a ready Access database if your to lazy to
make one yourself :P.
To be able to create a recordset (Step 2) you have to have a valid connection.
To make a new connection goto modify --> Connections
Press new and choose Custom Connection String.
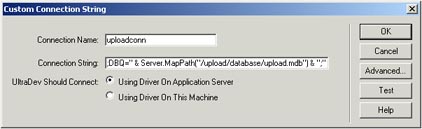
Call the connection uploadconn and insert this connection string:
"DRIVER={Microsoft Access Driver (*.mdb)};DBQ=" & Server.MapPath("/database/upload.mdb") & ";"
this connection string works only if the page your applying the upload extension
is in the root of the server otherwise you will have to edit the server MapPath
until it works.
If your using windows Personal Web Server (PWS) the root of the server will
be "C:\Inetpub\wwwroot\" and that equals "http://localhost/"
that mean if you have a folder called upload with the script in your PWS the
server MapPath would be "/upload/database/upload.mdb" .
Step 2: Create a Recordset
If you don't already have the data bindings window open goto window -->
data bindings or press ctrl+F10.
Press the +sign and press "Recordset (Query)"
This is what you should get up
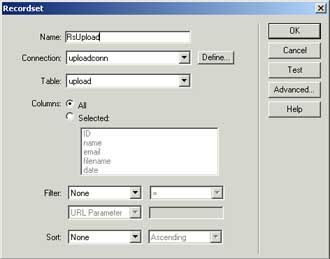
Enter " Rsupload " as the name
Choose the connection you just created from the dropdown list and press OK.
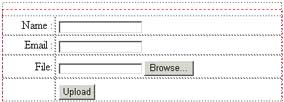
Step 3 : Now comes the fun part where you design the form
for the upload
If you don't have the objects palette press window --> Objects or ctrl+F2
Press the little arrow at the top of the objects palette and choose forms
![]()
First you have to have the form press the left button at the top and you will
se a red dotted line appear
the press the button on the right of that to insert a text field and press the
fourth button down on the left to insert a file (Browse) field.
and at last insert a button the second from the top on the left side.
Step 4: Important renaming
rename your fields by pressing them and typing the name into the properties
window if not open goto window --> Properties or ctrl+F3
rename them something like this
fmname
fmemail
fmfile
fmsubmit
and rename the form to fmupload by pressing somewhere in the form then pressing
the buttons at the bottom of the screen where it says form
![]()
This way the script won't give you any errors, because there are variables in
the script that are named name, filename and so on so don't use those whatever
you do.
It should look something like this now.
Step 5: Inserting the fields into the database.
If you haven't already got the Server Behaviours window open goto window -->
Server Behaviours or ctrl+F9
Press the +sign and choose "Insert Record"
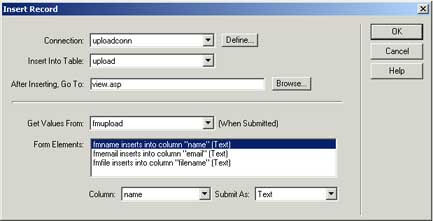
Choose uploadconn from the Connection dropdown
Choose which page you want the script to redirect to when it has uploaded.
Then you choose where the forms fields should be inserted.
Step 6: Inserting Upload extension.
If you haven't saved since last now's a good time to do so.
And now for some magic
Press the +sign in the Server Behaviours window and Choose the PureASPupload
that you should have installed by now :)
This window should popup.
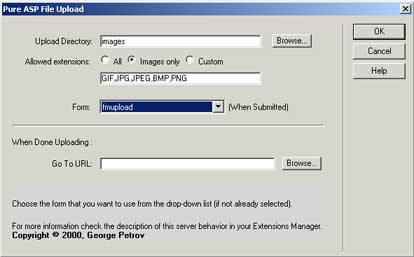
Choose where you want to put the images (I pressed browse created a new folder
called images and pressed ok)
Choose which file extensions you want to enable ex. .bmp .jpg
And press OK
If you jumped to this step you can choose a place to redirect to, but that's
only if you didn't do the other five steps.
There's nothing else but to save and go try out your ready to roll upload script.
Here's a ready script that works just change the connectionstring
to match your needs it uploads into a folder called images.
Best wishes // Leon Radley (radley@telia.com)
Comments
HELP!:)
I followed your tutorial to the tee. The problem lies in when I try to view it I either get a page can not be found error or it takes me to another page in my website. Any ideas?
Thanks,
Chris
RE: HELP!:)
Chris
IIS
When I apply the PureASPuplaod in my form and click submit, show one blank screen! You extension is not compatible with SQL Server.... Check this!
hmmm
You must me logged in to write a comment.