Premium Content


Premium Content articles are the very best articles from the world's leading internet technology, subject-matter experts. We have many categories of content below on a wide variety of subjects that have all been commissioned from big name authors.

Explore the Premium Content

Interface Widgets: Datagrid (part II)

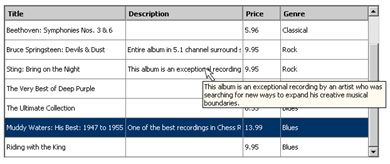
In this iteration of the series we will complete our datagrid widget which we started on in Interface Widgets: Datagrid (part I). Today we will cover a few more topics: columns sorting, editing records directly in the datagrid and printing the datagrid scrollable content.

Sortable columns

First of all let’s decide which columns will be sortable and by which one the datagrid will be sorted by default when the page first loads.

To me it made the most sense to sort the columns by Title, Price and Genre. I also decided by default the datagrid should be sorted by Title.  In order to show to the user the difference between the non-sortable and sortable columns we want to make the latter look more like buttons. I created a separate CSS class and applied it to all sortable columns.

.column_header_sortable{
border-top: 2px solid  ThreedHighlight;
border-left: 2px solid  ThreedHighlight;
border-bottom: 2px solid  ThreedShadow;
border-right: 2px solid  ThreedShadow;
color: ButtonText;
font-weight: bold;
padding:3px;
cursor: default;

To visually indicate the current sort order (ascending or descending) we need two images – for the “up” and “down” arrows. You can use the images below or create your own:

Down arrow:
Up arrow:

If you open those images with your favourite image-editing software you will see that both of them are semi-transparent gifs. Using transparent areas creates the desired 3D/ see-through effect and allows the arrows to “take on” the user’s system colour.
.

Place both images in each sortable header cell next to the column title.

Read More
How to Make Community-Building Pay

Last week I reviewed Amy Kim’s strategies about how to build and maintain online communities. Her outlook on community carried an “organic” or growth-oriented perspective. However, Amy’s strategies concerned a human aspect rather than a profit motive. Unless you have a lot of time on your hands or an inheritance, you might wonder how to pay for this community. This week, I’ll offer a few examples to explain how to grow profit along with your online followers.

Online Community + Profitable Ideas

While some Web developers are happy with the commissions that they make from associate programs, other folks might dream about a Web site that makes enough money so that they can quit their regular jobs. As avid Web users, you might have noticed that many seemingly profitable businesses utilize online community to help build customer loyalty. How do they do it?

Read More

Scripted motion and inertia

Scripted motion and inertia                                                  

This is the fourth article in the series on creation movement in Flash with ActionScript. So far we’ve looked at moving an object in a straight line and in a circle using ActionScript. We’ve also looked at fading and rotating with code.

In this article, we’ll look at creating more realistic straight line motion. So far, the movement that we’ve created has used a constant speed. This is not very realistic as most of the motion in the real world consists of acceleration and deceleration. When an object moves, there is often inertia slowing it down. If you drove a car without your brakes on, inertia would decrease the speed of the car as you moved further away from your starting point. Similarly, when you drop an object from a height, gravity speeds it up as it gets closer to the ground.

By working through this tutorial, you’ll learn how to add inertia and gravity to your Flash objects. We’ll create functions that allow you to reuse your code throughout your Flash projects.

I've assumed that you are using Flash MX or Flash MX 2004 and that know how to add ActionScript to a movie. I've used ActionScript 1.0 for the examples.

You can download the source files for the tutorial from the blue Properties box that contains the article PDF. There's a heading titled Code Download and you can click the Details link next to it to get the zip file. The download includes the starter files you'll need as well as the completed files.

Note: If you have difficulties downloading the source files or PDF, you might have a problem with your cookies. Delete the cookies from your machine and try again. In Internet Explorer, you can do this by choosing Tools > Internet Options… and clicking the Delete Cookies… button on the General tab.

Read More

Interface Widgets: Datagrid (part I)

Whether you use the web for shopping or banking, blogging or content management, every once in a while you stumble across an interface widget that makes you wonder: “how the heck do they do it?”

One of those widgets is the datagrid that looks and behaves like your datagrid /spreadsheet in a desktop application: scrollable with static headers, selectable rows and editable cells, sortable columns and other “desktop-like” features.
In this and the following articles of the Interface Widgets series you will learn how to create a datagrid like this in Dreamweaver from scratch.

Read More

Maintaining Viewer Loyalty with Community-Building

How do you build and maintain an online community for your site? How can you instruct your clients on how to build online loyalty for their sites? Further, how can anyone handle the angst that seems built into interactivity with unknown and sometimes hostile viewers? When Amy Jo Kim wrote her book, “Community Building on the Web” in 2000, she outlined some of the first guidelines for building online interactive loyalty with an emphasis on “organic” growth. In this article, I’ll review Amy’s strategies and compare them to a current venue to consider whether her strategies still stand true.

Read More

Fireworks MX & MX2004: Fun with Productivity - Part 1

It's no secret, when designing a site, your graphics need to be sliced, diced, optimized, and even put back together in our (X)HTML pages. In a previous article, Things you should know about FW (part 1), I covered basics of features like Symbols and Styles, perfect for during the production process. Now, I'm going to show how we can chop down more grunt work areas before and after we draw any of our cool ideas; we'll be more productive thanks to Fireworks. This article shows productivity tips that work in both Fireworks MX & MX2004.

  • Learn where and what shortcuts (not keystrokes) provide you less mouse strain.
  • Learn “safe sizes” for designing web-pages, making sure they fit in each popular browser nicely.
  • Take “safe sizes” to another level of productivity, utilizing a free FW extension.
  • Learn to batch process like a pro.
Read More

Separating Form and Function: JavaScript and HTML

Wherever CSS and Standards are discussed, you'll often hear about separating content from presentation. Meaning (X)HTML for content and CSS for presentation. At the same time as we separate the content and layout, we can also separate out our JavaScript functionality from the main document, for much the same reasons.

In this tutorial we'll look at moving the JavaScript code out of the HTML document, to keep our page sizes down and our code reusable. We'll look at a different way to handle user initiated events via the script, and develop a sample piece of code for clearing a search box into a more reusable piece of code.

Read More

K.I.S.S. Accessibility and Design Issues

How much movement – or confinement for that matter – do you need on your Web site to capture a viewer’s attention? Do you really want to build in <target=”blank”>, add animations that slow down the presentation, or confine your pages to a static frameset? While all these tricks and more are available to the Web designer, what criteria can the designer use to just say “no” to these gimmicks? Further, how does a Web designer convince a client that he really doesn’t want that moving water applet? This week, I’ll share a few reasons why designers might cease these activities. Accordingly, you can use these reasons to help your client understand “understated” and “accessible.”

Web Designer as Accessibility Thief

My mother actually told me when I was a mere pup that I shouldn’t complain about my trek to the bus stop, because she had to walk two miles to school each day up and down a hill. I’ve seen that hill, and it’s nasty. Although her reprimand has become a cliché, it returned to haunt me this morning as I sat to write this article. I can picture it now…In about five to ten years I’ll respond to my grandchild’s complaint about his quark-second delay in download time: “Listen, sonny, I remember when I had to deal with pop-up windows, moving water applets, and frames in the hands of inexperienced Web designers. Get over it.”

Read More

CSS From the Ground Up: Linked Style

While inline and embedded style are also considered part of CSS’s application hierarchy, grouped within “author styles,” it is the linked style sheet that gives designers and developers the utmost power over their work.

This power isn’t limited to design, of course. It also involves several other critical issues, as I’ll examine with you in detail in this installment of CSS from the Ground Up on DMXzone.

Linked Style within the Cascade

As mentioned in previous articles, there are three groups of style sheets: Browser, User, and Author styles. Browser styles are those styles that are defaults provided by the Web browser. If you don’t apply a style to some element, the default browser styles come into play. Browser styles take the least precedence over other styles.

On the other side of the fence, there’s user style, which is style created by a user. This is typically done for those individuals with accessibility needs that require they have high contrast or large fonts. User styles are typically the most powerful of all, due to the fact that they were intended for this kind of special need. In the middle we find the author styles, which are the styles we as authors create for our pages. Author styles include inline style, which controls the style of one element; embedded style, which controls the style of one document; and finally, linked style – the holy grail of CSS.

So why would I call linked style “the holy grail” of style sheets? Well, there are plenty of reasons. Let’s take a look at some of them.

Read More

Coldfusion MX (7), Multiple Update Delete Functionality

Click click click click click…. AAAHH! The clicking madness

One of the common user friendly functionality is the ability to update and/or delete multiple records at the same time. This has benefits for the user because it is much easier to maintain data and the user doesn’t need to click hundreds of times to do the same with 1 click. But also the traffic of your database and web server goes down enormously and in the end it will benefit your application. So if you want to make your customer happy, this is the way to go if you need to update records frequently.

In this article we’re going to build a “restaurant menu manager”. With this manager you can insert dishes, put them in a specific dish type and set the display order of the individual dishes within a dish type.

Sounds complicated huh?! If you’re not familiar with Coldfusion, it could be, if you are familiar, it isn’t.

So take a look at the prerequisites

Read More

Implementing Site Search with FreeFind

Thanks to the widespread popularity of search engines like Google, most computer users know that the answer to nearly any question can be found on the internet. The problem is that finding the specific bit of information they seek may be harder than they expected. If you can help your site's visitors find the information they need with a minimum number of clicks, you can make them very happy. You’re on your own to create compelling content, but this article can help you create a search feature your visitors will love.

FreeFind offers hosted search technology, so there's nothing to download or install.

Read More

Scripting fades and rotation

This is the third article in the series on creation movement in Flash with ActionScript. In the first article, I looked at how you could move an object in a straight line using ActionScript. The second article covered circular movement.

In this article, I'll show you how to create fade in and fade out effects with ActionScript. I’ll introduce you to the concepts and then we’ll load an external photo and fade it in. I’ll also show you how you can rotate objects with ActionScript.

I've assumed that you are using Flash MX or Flash MX 2004 and that know how to add ActionScript to a movie. I've used ActionScript 1.0 for the examples.

You can download the source files for the tutorial from the blue Properties box that contains the article PDF. There's a heading titled Code Download and you can click the Details link next to it to get the zip file. The download includes the starter files you'll need as well as the completed files.

Note: If you have difficulties downloading the source files or PDF, you might have a problem with your cookies. Delete the cookies from your machine and try again. In Internet Explorer, you can do this by choosing Tools > Internet Options… and clicking the Delete Cookies… button on the General tab.

Read More
Newer articles Older articles