
This chapter will show you how to create horizontal or vertical text, text fields that bring in text from an external document, make text scroll, and create text fields where someone can enter information themselves.
This sample is taken from Chapter 12: "Working with Text" of the glasshaus title "Flash MX H.O.T"


Creating, Modifying, and Formatting Text
In Macromedia Flash MX, you have a lot of control
over the attributes of type. By using the Property Inspector, you can change,
preview, and adjust text in a few easy clicks of the mouse. The next section
will give you a close look at each of the available settings.
Text Options in the Property Inspector
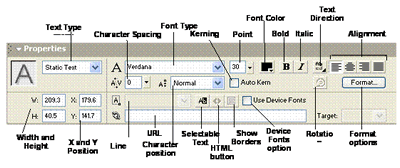
12_00_09
As soon as you select the Text tool, the Property
Inspector will display the text attributes available to you. A chart follows
detailing each of the items labeled above.
| |
|
| |
Allows you to choose
from one of three behaviors (Static Text, Dynamic Text, or Input Text)
for the text box. Each text type has its own associated options that
will appear in the Property Inspector when that text behavior is selected.
Static Text is the default behavior. |
| |
Displays the name
of the current font. Click the arrow to the right of the font name to
view a list of all the available fonts. As you scroll through the font
list, Macromedia Flash MX displays a preview of what each font will
look like. |
Character Spacing (Tracking)
|
Allows you to adjust
the space between characters in selected text. Click the arrow next
to the Character Spacing field and use the slider to increase or decrease
the amount of space between characters. |
Character Position (Baseline
Shift)
|
Normal: Resets
characters to the baseline.
Superscript: Shifts characters above the
baseline.
Subscript: Shifts characters below the
baseline. |
| |
Displays the current
font point size. Click the arrow to the right of the Point Size field
and use the slider to adjust the size of the font. |
| |
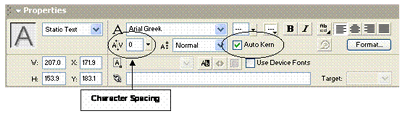
Controls the spacing between pairs
of characters. Checking this box will automatically use the font's built-in
kerning information. (See the note below for more information on kerning.) |
| |
Allows you to change
the color of the type by presenting you with a palette of available
colors. Note: For text blocks, you can use only solid colors, not gradients.
If you want to use gradients, you have to break the text apart, which
will convert it to a shape, and then you can apply a gradient. |
| |
Bolds the selected
type. |
| |
Italicizes the
selected type. |
| |
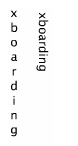
New to Macromedia
Flash MX. Changes the direction of the text. You can choose from Horizontal;
Vertical, Left to Right; and Vertical, Right to Left. |
| |
Controls how the
selected text will be aligned: Left Justified, Center Justified, Right
Justified, or Full Justified. |
| |
Allows you to have
more control over vertical text and change its rotation.
12_00_10
This option is available only for vertical
text. |
| |
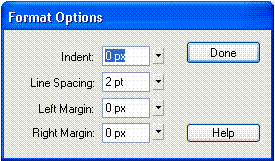
Launches a pop-up
window with options for formatting text blocks where you can specifically
set the values. For horizontal text, the options are Indent, Line Spacing,
Left Margin, and Right Margin. For vertical text, the options are Indent,
Column Spacing, Top Margin, and Bottom Margin.
12_00_11
Indent controls the distance between the
margin of a paragraph and the beginning of the first line of a paragraph.
Line/Column Spacing (Leading) controls
the spacing between lines of type (horizontal text) or between vertical
columns (vertical text).
Left/Top Margin determines the amount of
space between the characters and the left side (horizontal text) or
top (vertical text) of the text box. Even if text is centered or right-aligned,
increasing the amount of space in the left/top margin will create the
space you specify from the left side/top of the text box to the leftmost/first
character within the text box.
Right/Bottom Margin determines the amount
of space between the characters and the right side (horizontal text)
or bottom (vertical text) of the text box. |
| |
Displays the width
and height of a selected text box. |
| |
Displays the X
and Y position of a selected text box, relative to the Stage, where
0, 0 is the top left of the Stage. |
| |
Creates a hyperlink
that is attached to selected text. In effect, this creates a Button
that will link to an internal or external HTML file, without the need
to create a Button symbol. Using this option will automatically add
a dotted line under the linked text in the .fla file. Note, however,
that hyperlinks created using this feature will not carry any visual
feedback (such as an underline) in the .swf file, although when previewed
in a browser, the hand icon will appear when the user moves his or her
mouse over the linked text. You learned a better way to create a hyperlink
in Chapter 11, �ActionScripting Basics.� |
| |
Allows you to choose
from Single line (displaying the text on one line), Multiline (displaying
the text in multiple lines with word wrap), Multiline No Wrap (displaying
the text in multiple lines), and Password. This option is available
only for Dynamic and Input Text. |
| |
Allows a user to
select text within a block and either copy it or cut it. |
| |
Preserves Rich
Text Formatting, including fonts, hyperlinks, and bold with the appropriate
HTML tags. You will learn to use this option in Exercise 3 of this chapter.
|
| |
When selected,
displays a white background with a black border for the text field. |
| |
If this box is
not checked, Macromedia Flash MX will embed font information for any
fonts used within the text block. When the movie is exported, this font
will appear antialiased (not jaggy).
If this box is checked, Macromedia Flash
MX will prevent the font information from being embedded. You will learn
more about device fonts in Exercise 1 of this chapter. |
12_00_12
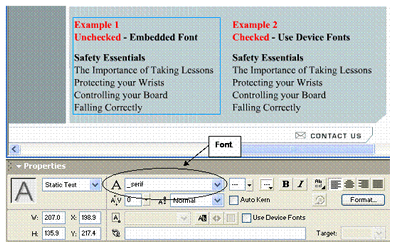
1. Working with Static Text and Device
Fonts
When you add text to your Macromedia Flash MX
project, it is important to be aware of what the end user will see when looking
at the text on a live Web site. Often this will differ from what you see on
your Stage � at first glance the text on the Stage might seem fine, but when
you preview the movie in a browser, it can look fuzzy or out of focus. There
is an option called Use Device Fonts that allows your text to appear
sharper in a Web browser. This exercise will teach you the difference between
embedded and device fonts. You will work with predeveloped Static Text blocks
and then export the blocks of text using both options to see the difference
between checking and not checking the Use Device Fonts box.
1. Copy the chap_12 folder, located on the H.O.T CD-ROM, to your hard drive. You need to have this folder on your
hard drive in order to save files inside it.
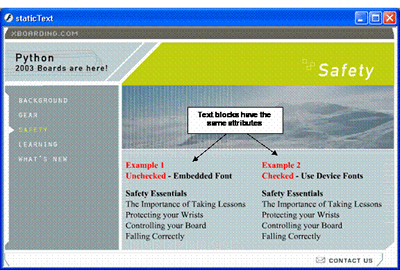
2. Open the staticText.fla file from the chap_12 folder.
This file has been created to get you started. Notice the two text blocks side by side. Both of these
text blocks have the same text attributes.
12_01_01
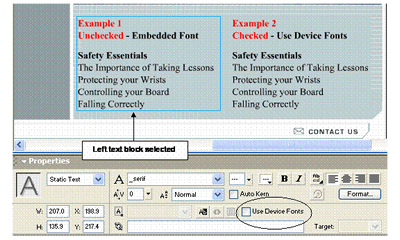
3. Using the Arrow tool, select the left block of text and
make sure the Property Inspector is open (Window > Properties).
In the Property Inspector, notice that the Fontsetting applied to that text block is _serif. Click on the right
text block and you will notice the same Font setting.
12_01_02
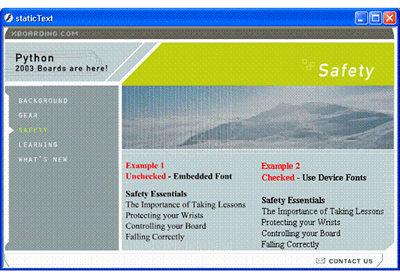
4. Choose
Control > Test Movie to preview the text blocks. Notice that nothing
is different between the two blocks of text.When you are finished, close the Preview Window.
12_01_03
5. Select the left block of text. In the Property Inspector,
notice that the Use Device Fonts box is unchecked.
This is the default setting when you create a Static Text block. In effect,
it will create an embedded font.
12_01_04
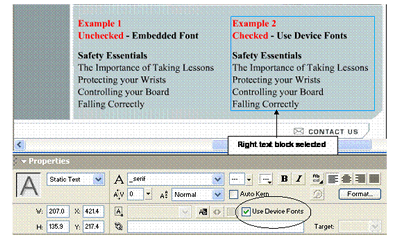
6. Click on the right block of text to select it on the Stage.
In the Property Inspector, check the Use Device Fonts box.
12_01_05
7. Choose Control > Test Movie to preview the movie. Notice
that the Embedded Font text block on the left is fuzzier, whereas the text
on the right is sharper? This is because the text block on the right is
using a device font, which is a quick way to keep the file size down and
allow the text to be readable even at smaller font sizes.
8. Save and close this file.
12_01_02b
2. Loading Dynamic Text Fields Using External
Files
Oftentimes you may want to add functionality
to your Macromedia Flash MX movie, so that it displays current information
such as news, weather reports, or company information that will get updated
often. Macromedia Flash MX allows you to do this using a Dynamic Text field,
a variable, and an external file that holds the text. This allows Macromedia
Flash MX to be a robust program for handling dynamic content. The following
exercise will take you through these steps and teach you how to load a precreated
.txt file right into a Dynamic Text block.
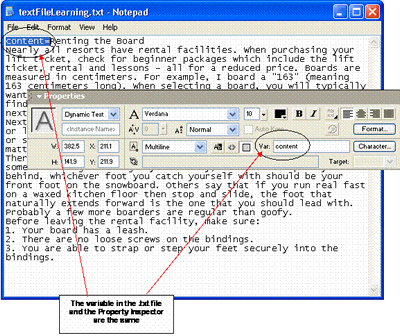
1. Open the chap_12 folder, and double-click on the textFileLearning.txt
file to open it. This is not a Macromedia Flash MX file, it is a .txt file,
and it will open in the default text editor on your computer. This .txt
file has been created to get you started.
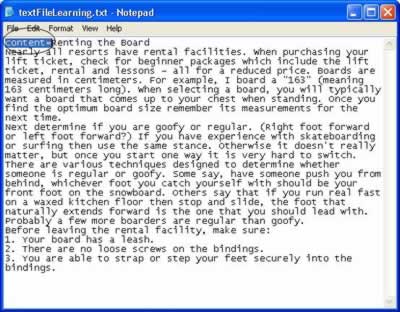
12_02_01
2. In order for Macromedia Flash MX to recognize the information in
this file, you need to give it a variable name. Place your cursor at the
very beginning of the paragraph and type content= , just as you see
in the picture above. You have now declared that the text within the text
file will be assigned to the variable name content.
3. Save and close the text file. Make sure you save it in the chap_12
folder, because Macromedia Flash MX will be referring to this file in
later steps.
12_02_02
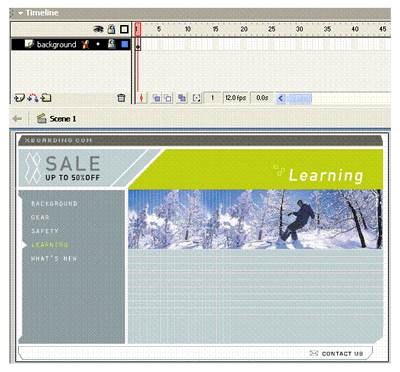
4. In Macromedia Flash MX, open the dynamicText.fla file from
the chap_12 folder. Notice that this file contains one layer with a
background image.
5.
In the Timeline, add a new layer by
clicking the Insert Layer button, and rename this layer holder.
12_02_03
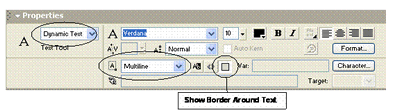
6. Select the Text tool from the Toolbox. In the Property
Inspector, choose Dynamic Text, Multiline, and Show Border
Around Text. Make sure the Font Color is set to black and
the Font Type is set to Verdana with a Point Size of
10.

12_02_04
7. With the holder layer selected, click and drag on the Stage
to create a text field that looks just like the picture above.
12_02_05
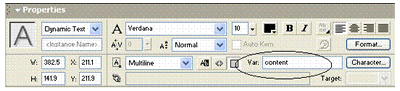
8. In
the Property Inspector, type the word content in the Var
(variable) field. This will be the variable name that is assigned to the
text field.
12_02_01 copy and 12_02_05 copy
9. On the Main Timeline, click the Insert Layer button
to add one last layer, and rename the layer actions. Make sure the
actions layer is above all other layers.
10.
Select the first frame on the actions
layer of the Timeline and open the Actions panel (Window
> Actions, or use the shortcut key F9).
12_02_06
11. Inside
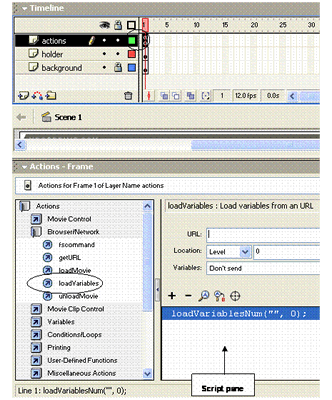
the Actions panel Toolbox, choose Actions > Browser/Network and double-click
on the loadVariables option to add it to the Script pane.
12_02_07
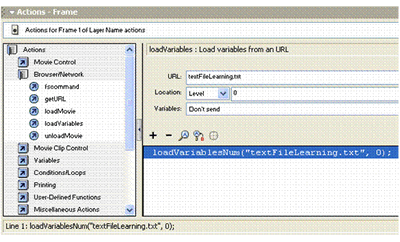
12. For
the URL, type textFileLearning.txt (this is the text file you modified
in step 2), using lowercase and capital letters exactly as you see here. You
can leave the other settings at their defaults. This ActionScripting command
tells Macromedia Flash MX to look for textFileLearning.txt and to load
the variables from that file into the movie (level 0). Since you assigned
the variable name content to both the Dynamic Text field and the text
within the textFileLearing.txt file, the text field will be populated
with the text from the .txt file.

12_02_08
13. Choose
Control > Test Movie to test your movie! When you are finished,
close the Preview Window.
DMXzone George Petrov is a renowned software writer and developer whose extensive skills brought numerous extensions, articles and knowledge to the DMXzone- the online community for professional Adobe Dreamweaver users. The most popular for its over high-quality Dreamweaver extensions and templates.
George is also the founder of Wappler.io - the most Advanced Web & App Builder
See All Postings From George Petrov >>
Comments
asdf
great!!
Perfect to start working with text.
It was so helpful to me.
But I get and error in the username/password example. If somebody can give a hand i will very greatful.
It seems everthing is ok, but it doesn't verify the password , whatever I write I go always to frame 10 (pass) and never reach the frame 20 (fail). :-) thank you
nice tutorial...but...
Multiline Text
Indeed, this is very useful information. I apologize if this is not the correct forum for asking questions. But I have the same problem as Stefaan. How do you keep a mulitline text box from starting a new line with a space character? It's very annoying besides ugly. Thanks.
You must me logged in to write a comment.