This tutorial will show you how to create a flyout side menu with the Layer Genie extension.
You can take a look at the results by clicking here.
Check the Demo page for results
This tutorial will show you how to create a flyout side menu with the Layer Genie extension.
You can take a look at the results by clicking here.
Check the Demo page for results
In this tutorial I will show you how you can create the menu, that you can view on the demo page, with the help of Layer Genie. The menu scrolls out if you move the mouse over the middle part. If the menu is rolled out you can select the different menu items. If you click on the menu items, other layers will appear with different effects and these layers will contain info on other extensions from DMXzone.
First make an layer, do this by pressing the layer button ![]() .
.
In the layer make a table ![]() with
3 rows and 2 columns. The left column has an width of 100 and the right an width
of 20. The middle row has an height of 70. The horizontal alignment of the cells
is center and the vertical alignment of the cells is middle. For the background
picture I used one picture, offcourse you can also use different pictures for
the borders to make it more dynamic. The picture is set as background in the
table.
with
3 rows and 2 columns. The left column has an width of 100 and the right an width
of 20. The middle row has an height of 70. The horizontal alignment of the cells
is center and the vertical alignment of the cells is middle. For the background
picture I used one picture, offcourse you can also use different pictures for
the borders to make it more dynamic. The picture is set as background in the
table.


The left picture shows the background picture that is Used for the menu and the right picture shows how I devided the menu with the help of an table and also shows all the content I inserted.
Use the following settings, you can set them with the Properties inspector: L=-100 T=10 W=120 H=300 vis=visible. Make this layer an second time, same dimensions and picture, with the following settings: L=0 T=10 W=120 H=300 vis=hidden Layer ID=Menu.

The rollover images ![]() for the
selections are made with the default macromedia component. The buttons are two
different pictures, one in grey and the other in colour. The actions for these
buttons I will discuss later.
for the
selections are made with the default macromedia component. The buttons are two
different pictures, one in grey and the other in colour. The actions for these
buttons I will discuss later.
Select the cell of the table on layer 1 where you want to put the behavior on. Now we are going to apply layer genie. You can find layer genie under your behaviors, press the + button and select DMXzone -> Layer Genie -> Show Layer Genie.

The following settings are used to rollout the menu:

Be sure to select the correct layer, we want to the 'Menu' layer that we made.

For the rollout the Slide into Place is used, the offset is -100. Now if the mouseover event is done the menu layer is shown at position -100 and will slide into place.

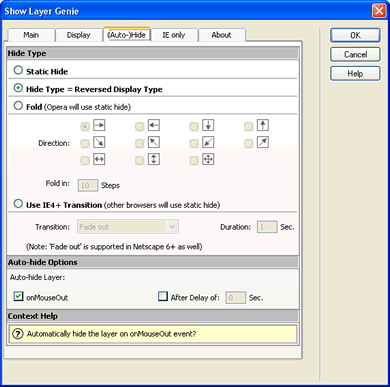
For hiding the menu again I use the onMouseOut and Hide Type = Reversed Display Type. This way it uses the same effect, in our case it will move back to the offset -100.
 George Petrov is a renowned software writer and developer whose extensive skills brought numerous extensions, articles and knowledge to the DMXzone- the online community for professional Adobe Dreamweaver users. The most popular for its over high-quality Dreamweaver extensions and templates.
George is also the founder of Wappler.io - the most Advanced Web & App Builder
Comments
compatibility
Persistent Sliding Menu
I would like to do something similar to this but using a menu that slides up from a persistent layer stuck to the bottom of the page.
The idea is that I have a bar at the bottom of the page that acts like a frame, however, when there is new news to display the bar will change with text saying new news. When the viewer hovers over it it slides up to say, 5 times it's hieght to reveal a scrolling window of news highlightes.
Is this possible using your extension?
Paul J Shadwell
RE: Persistent Sliding Menu
You must me logged in to write a comment.