Connecting to a MySQL Database from within UltraDev can be a little daunting, especially if you're new to UltraDev. This tutorial explains how to connect to a MySQL database using MyODBC. Extremely usefull for PHAkt users!
Using PHAkT v1.0: Connecting to a MySQL Database using MyODBC
Using PHAkT v1.0
Connecting to a MySQL Database using MyODBC
Now that you have successfully installed the MyODBC driver (see Stage 1 ) you are ready to proceed to Stage 2.
Stage 2: Creating a MyODBC Data Source (DSN)
If you have already completed this stage, go to Stage 3.
This is a relatively simple step, provided that you have all the information that you need before creating the Data Source. A mistake at this stage can be very hard to diagnose later.
You will need the following information to create a MySQL Data Source :-
- The name you wish to call this Data Source. It is important that the name has some meaning to you, so that it is easily recognized. It is also adviseable that there be no spaces in it, so while 'MySQL DataSource' isn't very good, 'MySQLDataSource' is fine. ODBC will actually allow you to create a DSN with a space in the name, but it isn't good practice and it can again make problems very difficuly to diagnose at a later time.
- The MySQL Hostname, or IP Address. If MySQL is running on your local machine then you could put 'localhost' or '127.0.0.1'. If you are creating a DSN to connect to a remote MySQL server you must ensure that you have the correct IP address or hostname. (I always use the IP Address if at all possible).
- The name of the Database you wish to connect to on the MySQL server.
- Your MySQL Username and Password.
- The port number that MySQL runs on. In the majority of cases this will be the default port (3306), but it is important to check.
 Once you
have collated all of this information you are ready to proceed. Open Control
Panel (Start->Settings->Control Panel) and find the item marked ODBC
Data Sources (32 bit). Now double click it.
Once you
have collated all of this information you are ready to proceed. Open Control
Panel (Start->Settings->Control Panel) and find the item marked ODBC
Data Sources (32 bit). Now double click it.
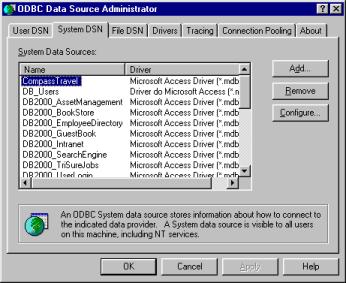
This is the ODBC Datasource Administrator. Click on the System DSN tab (if you wish you can create a File DSN, just click the File DSN tab and follow the rest of this procedure).
Click on Add :-
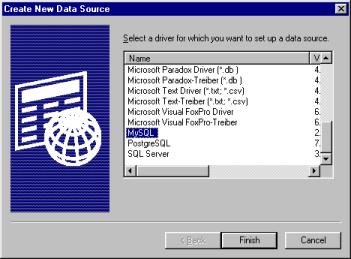
Select MySQL from the list, and then click Finish. You will now be presented with a form which will ask for all of the information you collated earlier.

Fill in the DSN name, MySQL host, MySQL Database Name, User, Password and (if applicable) Port. Leave everything else at their default values. When done, click OK.
Congratulations ! You have created your MyODBC DataSource. You're now ready to proceed to Stage 3 where you will learn how to use this connection with UltraDev and the PHP Server Model.
| <<< Previous Page | Next Page >>> |
Tim Green
 36 Years Old and recently married. Initially started as a COBOL, PASCAL, FORTRAN, ALGOL, 6502 and Z80 Assembly language programmer at age 16.
At age 19 I chased a career in acting where I had a couple of 'Extra' roles and appeared in 'Robin Hood' (no not the Kevin Costner one). Missed out on my big break when I contracted pneumonia which stopped me working on Aliens 3.
Following a 5 year stretch as a casual barman, chef and waiter on Spain's Costa Brava, I returned to the UK where I began work, on a VERY busy IT Support helpline.
Quickly moving through the ranks to Team Leader of Hardware, Software, 2nd level and Principle Support, I finally left after raising the service level from 17% to 98% and getting demoted by way of reward.
CEO of The Rawveg Consultancy, I provide custom extension development services, IT Consultancy, B2B and eBusiness consultancy services.
Comments
Be the first to write a comment
You must me logged in to write a comment.