

IDataErrorInfo
This interface offers custom error information that controls can bind to. During
data binding, this allows controls to retrieve specific error information from
the data source itself. For instance, if a particular column in a DataTable
is an Integer type, setting a field to a string for this column will cause the
data source to return an appropriate error. This interface provides to properties:
Error: Returns an error message indicating what is wrong.
Item: An indexer that gets the error message for the specified column
name or property name.
Complex Binding Example
In the last section, we saw how to implement
simple binding. We discussed how to bind public properties of controls to
properties of objects and columns of DataTable objects,
and synchronize the data, one item at a time. But there are also situations
where an entire collection of data needs to be bound, such as viewing a list
of software bugs. Typical controls that support such complex data binding
include the DataGrid, ListBox, ComboBox, and ErrorProvider controls.
All complex data bound controls will expose
two important properties: DataSource and DataMember.
The DataSource property can be any type derived
from the interfaces discussed earlier. The DataMember
is a string containing either the table name or a public property to bind
to. For example, if the DataSource is a DataSet,
the DataMember should specify which table to bind to; if the DataSource is a collection, the DataMember
should be null; and if the DataSource is an object
that has the binding collection as one of its public properties, the DataMember will be the name of that property.
In this example, we will utilize the DataGrid to bind to the array of customers used in the previous
simple binding example.
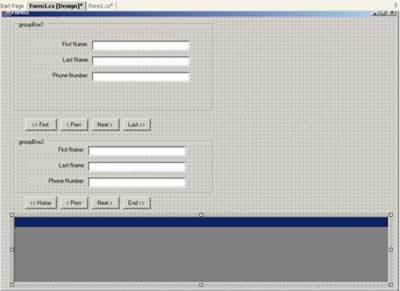
First, drag the DataGrid
control from the toolbox to the form that you created in the simple binding
example. Also, drag another set of navigation buttons to the form. Each set
of navigation buttons should correspond to a group box, and hence, a BindingContext. The DataGrid will
display the entire list of customers (which is only three items for this example).
We also want to use the row navigation events of the grid to change the current
item in the first group box. You will have to rearrange the controls and resize
the form as shown:
Also, in order to tackle another bird with this stone, add a PropertyGrid control
to the form. The PropertyGrid is not added to the toolbox by default, so right-click
the toolbox, click "Customize Toolbox&," navigate to the .NET Framework
Components tab, and select the PropertyGrid control. The PropertyGrid will be
synchronized with the current item in the list, displaying that item�s properties.
The PropertyGrid control should be placed on the form as shown:
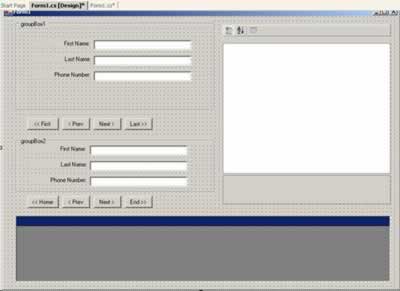
Name your controls as follows:
DataGrid: _dataGrid
PropertyGrid: _propertyGrid
Now, using the code from the simple binding
example, add two these lines to the constructor:
_dataGrid1.DataSource = _customers;
_propertyGrid1.DataBindings.Add("SelectedObject",
_groupBox1.BindingContext [_customers], "Current");
Here is a breakdown of what is happening
with this code. First, we set the DataSource property
of the data grid to the Customers collection. Since this is the collection
we want to bind to, there is no need to set the DataMember
property. Next, we synchronize the PropertyGrid
with the current customer of the first group box. The PropertyGrid
exposes a property, SelectedObject, which is used
to display all public browsable properties of an
object.
Now compile and run the sample. Notice that by clicking the navigation buttons
of the first group box, the PropertyGrid automatically updates its display
for the new current object. It does this with only one line of code. But there
is one small problem: Selecting different rows of the DataGrid does not cause
navigation in the first group box that we expected. By now, you should already
know what the problem is. It�s the BindingContext. Since we did not explicitly
assign a BindingContext to the DataGrid, it will use the Form's default BindingContext.
And in this example, the Form's default BindingContext isn't managing any data
bindings. To get around this problem, we simply assign the BindingContext of
_groupBox1 to the BindingContext of the DataGrid, as shown:
_groupBox1.BindingContext = new BindingContext();
_groupBox2.BindingContext = new BindingContext();
&
_dataGrid1.DataSource = _customers;
_dataGrid1.BindingContext = _groupBox1.BindingContext;
Now if we run the code, navigation will
work as expected, with only one extra line of code. The full constructor is
shown below:
privatereadonly
Customer[] _customers = null;
public Form1()
{
InitializeComponent();
_customers = new
Customer[]
{
new Customer("James",
"Henry", "123-123-1234"),
new Customer("Bill",
"Gates", "234-234-2345"),
new Customer("Tupac",
"Shakur", "777-777-7777"),
}
_groupBox1.BindingContext = new BindingContext();
_groupBox2.BindingContext = new BindingContext();
_dataGrid1.DataSource = _customers;
_dataGrid1.BindingContext
= _groupBox1.BindingContext;
_propertyGrid1.DataBindings.Add("SelectedObject",
_groupBox1.BindingContext [_customers],
"Current");
_firstNameTextBox.DataBindings.Add("Text", _customers,
"FirstName");
_lastNameTextBox.DataBindings.Add("Text", _customers,
"LastName");
_phoneNumberTextBox.DataBindings.Add("Text",
_customers, "PhoneNumber");
_firstNameTextBox2.DataBindings.Add("Text", _customers,
"FirstName");
_lastNameTextBox2.DataBindings.Add("Text", _customers,
"LastName");
_phoneNumberTextBox2.DataBindings.Add("Text",
_customers, "PhoneNumber");
}
Comments
Be the first to write a comment
You must me logged in to write a comment.