Ever wanted to have a nifty flash gallery for all your photos? With the Flash Album Generator you can do that quickly and easy! This extension will resize your photos with Fireworks, create thumbnails and put them in an amazing Flash Album. The album is generated from Dreamweaver within a few clicks! All your photo’s will be displayed online instantly in a cool Flash Photo Viewer that is fully customizable to your site design.
This manual explains the features and how to use the Flash Album Generator extension.


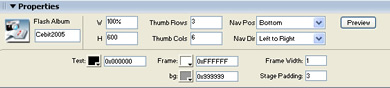
In this chapter we’re going to edit the properties of the photo album using the property inspector of Dreamweaver. Click on the Flash object in the design view to display the properties of the photo album. Below is a screenshot of the property inspector.
The name of the XML file is displayed at the left side of the screen, this is also the Flash ID name.

You can view your changes by pressing the preview button;

You can also change the width and height of your album dynamically by changing the width and height fields;


Here is a screenshot of the album with the changed width and height fields;

As you can see there are too many thumbs to fit in our album. Let’s change the number of columns to 3 to fix this;

Here is a screenshot of the album with 3 columns;

You can also change the number of rows but we’ll leave those the same for now;

Let’s change the Navigation Position to "top":

Here is a screenshot of the album with the navigation position set to top;

Let change the navigation direction to go from right to left;

Here is a screenshot of the album with the navigation direction set from right to left;

To change the text color of the movie you can use the color picker or enter a hexadecimal value in the property area.

Here is a screenshot of the album with the changed text color;

You can also change the frame and background color but we’ll leave those for now. Let’s change the Frame width to 5;

Here is a screenshot of the album with the changed text color;

Let’s decrease the stage padding to 0;

If you watch clearly, you see that the image size has increased by a few pixels because it has a bit more room (because of the decreased padding);

This concludes our tutorial. We’ve shown you how to use our extension and we hope you’ll enjoy it!
Comments
Another Great Product
You must me logged in to write a comment.