Free! Building a website with Restricted Access: Part 1
In this tutorial we will be creating a site, which has several user levels.
We will be using the standard behaviours of Dreamweaver MX 02/04 and we will also add some new ones.
Part one of the tutorial will be covering the Set-up of the site, creating an Access database and providing login access to our site, along with a registration facility.
We will be creating a Login page using the standard Dreamweaver behaviour, and then altering the code to allow us to use a single login page for both Administration and Standard users.
![]()
![]()
![]()
![]()
![]()
![]()
Building a website with Restrictive Access: Part I
In this tutorial we will be creating a site, which has several user levels.
We will be using the standard behaviours of Dreamweaver MX 02/04 and we will also add some new ones.
Part one of the tutorial will be covering the Set-up of the site, creating an Access database and providing login access to our site, along with a registration facility.
We will be creating a Login page using the standard Dreamweaver behaviour, and then altering the code to allow us to use a single login page for both Administration and Standard users.
Furthermore we will be creating an additional Session from the login behaviour, so we can filter a recordset throughout the site to show our visitor’s details, such as their Name, on every page.
To enable our visitors to gain access to view the restricted parts of the site, we will be creating a Registration page.
This tutorial does expect some level of experience with ASP, although you don’t have to be an expert, as all code is provided and step-by-step guidelines are given.
You will need
- A copy of Dreamweaver MX 02/04, a Trial version can be downloaded from http://www.macromedia.com/downloads/
- Internet Information Servers (IIS) configured on your computer, ideally running Windows 2000 or XP Professional, XP Home does not come with IIS, and is somewhat difficult to install on the Home version.
This tutorial is written in VB ASP, and refers to Access as the database, but I do provide alterative code where required for using SQL server.
You do need to know how to set up either an ODBC or DSN-less connection to your Access database, for performance I would recommend a DSN-less connection on your local machine.
For a tutorial on creating a DSN-less connection for Access, visit http://www.drdev.net/article09.htm and for SQL server http://www.drdev.net/article10.htm
I have provided a completed version of the website pages and access database for this part of the tutorial to download via www.cgw3.co.uk/uploads/website_Restrictive_Access_PartI.zip to enable you to view the completed project.
In the second part of this tutorial we will be enabling our visitors to recall their access details, and tracking each users login data/time.
Furthermore we will enable our visitors to update their own details, and provide an Administration section to control the site accounts.
Creating a table for Users
Well to start ourselves off, we need to create the first table in our database to house the details of our registered users , so open your choice of database. .
Create a new database in your choice of flavour (Access, SQL Server, MySQL)
Create a new table and name it website_users
Create a column for:
- AccountID (Access= autonumber, SQL server = int, Identity, not for repeating)<--primary key
- UserName (Access=text, SQL server = varchar)
- UserPassword (Access=text, SQL server = varchar)
- UserEmail (Access=text, SQL server = varchar)
- UserForename (Access=text, SQL server = varchar)
- UserSurname (Access=text, SQL server = varchar)
- UserAccessLevel (Access=number, SQL server = numeric)
- UserCreatedOn (Access= date/time, default = now(), SQL server=date/time, default=getdate() )
- UserUpdatedOn (Access= date/time, SQL server=date/time)
- AdminUpdatedOn (Access= date/time, SQL server=date/time)
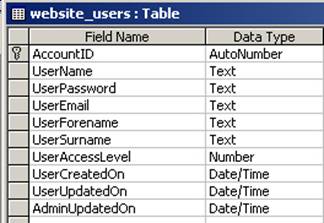
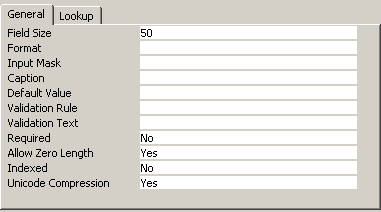
For the columns with Text as the type, set the properties for Allow Zero Length to YES and ensure Required is set to No.
For the UserAccessLevel column enter a Default Value of 2, this will ensure when a new user is created, following a visitors registration, the entry in the database will set the UserAccessLevel value to 2, which will be our level for a standard user.
UserAccessLevel value of 1 will be used for our Administrator users, later in the tutorial, we will be using the login page to decide which section of the website to move to based on the users UserAccessLevel value, so it is important to ensure this column has a value.
Registration page for Users
In the first part of our tutorial we create the table website_users, to house the basic login details, now for the whole registration process we are going to add in extra tables.
Open your database, and open the website_users table
You currently have fields for:
AccountID, UserName, UserPassword, UserEmail, UserForename, UserSurname, UserAccessLevel, UserCreatedDate, UserUpdatedOn and AdminUpdatedOn
You now need to add in additional columns:
- UserAddress1, (Access=text, SQL server = varchar)
- UserAddress2, (Access=text, SQL server = varchar)
- UserCityTown (Access=text, SQL server = varchar)
- UserRegion (Access=text, SQL server = varchar)
- UserPostcode (Access=text, SQL server = varchar)
- UserCountry (Access=text, SQL server = varchar)
- UserTelephone (Access=text, SQL server = varchar)
- UserFaxno (Access=text, SQL server = varchar)
- UserDOB (Access=date/time, SQL server = date/time)
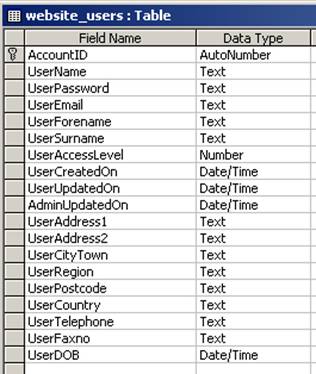
For the columns with Text as the type, set the properties for Allow Zero Length to YES and ensure Required is set to No.
![]()
![]()
![]()
![]()
![]()
![]()
Carl Grint
 " Since graduating from university, I have worked with Charities and the Public sector, with my longest time being 3 years with the NHS until returning to freelance in 2003.
I would like to think my diverse experience of working for both the Public and Private sector gives me a good all rounding which enables me to approach projects with a unique perspective and enables me to bring new thoughts and initiatives to my work.
I have always enjoyed passing on the lessons I have learned so other developers can bypass the 'working out' time I had to go through, and writing my first two articles for DMXzone has given me a chance to pass on what I think are some good ways to improve on the standard Authentication behaviours Macromedia supply with Dreamweaver."