Budget Web Design Tools - GIMP
 After reading Carrie Bickner’s book “Web Design on a Shoestring” (reviewed here), I started to wonder, just what kind of tools are out there for the “budget conscious” (ahem) web designer.
One of the most expensive items in any web professional’s arsenal, apart from a computer and Dreamweaver – which we’re assuming you’ve got, else why would you be here? – is an image editor. Photoshop by Adobe comes at over $700, because it can do everything and more – but for many of us, that’s overkill, as Photoshop was really meant for print designers. PaintShop Pro by Jasc comes in at around $80 and is good enough for the simple tasks.
But there’s an option that’s claimed to be as powerful as Photoshop, designed specifically for web use, that costs nothing at all. It is The GIMP. DMXzone's Bruce Lawson puts on his deerstalker hat and rubber mask to investigate..
![]()
![]()
![]()
Don't let the GIMP whip you!
When you start up, the program can be bewildering. The first thing that you'll notice is the lack of a workspace or even any menus! You just get this start screen (called the Toolbox) with pretty conventional and self-explanatory icons. Any boxes that pop up can be freely moved around the screen; they're not tied like many other Windows applications; I'm guessing that's because this was ported from Windows from Linux where (for all I know) the UI is different.
After that brief moment of surprise, I began to enjoy the flexibility of this interface. For example, after opening or creating a new document, any menu option is available on rightclicking the mouse. This is a great feature, in my opinion; in Photoshop, I reckon I do most of the damage leading to carpal tunnel syndrome by mousing over to the menus all the time (I'm too stupid to remember all the keyboard shortcuts). The most commonly used options are available on the main Toolbox (shown below). Clicking any of these activates the tool; double-clicking activates the dialogue box that controls the settings for the tool.
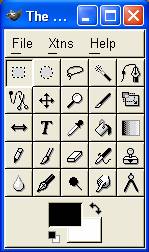
On start-up, all you see is the Toolbox.
For example, I used GIMP to grab the screenshot above. Clicking on the File menu offers the option "acquire" and you can acquire from screenshot (specifying a certain number of seconds delay if you wish, so you can go and start another program up). If you want just a shot of one window rather than the whole screen), you can drag a crosshair into the window you want the shot of. That's a timesaver; to take screenshots from articles, usually I have to hit "Print Screen", start-up Photoshop and then crop the window I want and save.
After taking a screenshot, GIMP then spawns a new window with your image. Clicking on the right mouse brings up all the menu options. Let's get a different image, and use the menu to crop the image.
Here, I've opened up an image of my daughter (scanned in from a poster from school) then right-clicked to get the crop tool. You can see how the menus cascade:
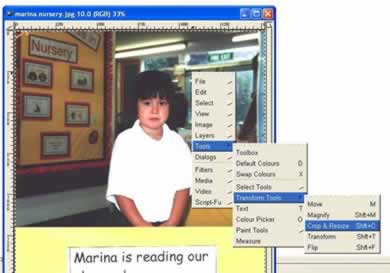
Right clicking on any image allows access to all menus, with sub-menus cascading.
The crop tool is very precise, although the selecting gridlines work a little differently from Photoshop:
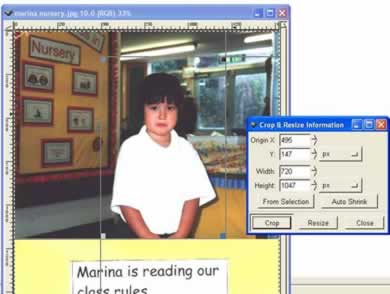
Using the GIMP crop tool.
Hitting the Crop button results in the cropped image, which can be saved as usual.
Other cropping and Selection Tools
All the other cropping and selection tools worked as you'd imagine, and very well. I found the Intelligent Scissors tool to be incredibly frustrating. It's a similar tool to the Photoshop Magnetic Lasso Tool, which makes a pretty clever attempt at following the outlines of a complex shape that you're trying to draw around. It does a great job of following the outline (by looking around and seeing areas of similar colour). However, all the other select tools allow you to draw your outline and then click inside the selection to allow you to save the selection into a different channel, delete it or remove it. After a couple of exasperating hours of trial and error and consulting the otherwise excellent manual, I was no closer to working out how to cut my daughter out of the classroom environment above and drop her neatly into a photo of Teletubbieland for her birthday card. It was back to Photoshop for that one. Cleverer minds than mine will have to work out how to do that (if you manage it, please put me out of my misery by letting me know in words of one syllable).
Filters and Image Processing
As with Photoshop, the GIMP has options for amending the colour, brightness and contrast of an image, including useful auto-balancing functions from Image > Colour. These all auto-preview as you adjust the sliders and are wholly intuitive to use. I tried the auto-corrects on a series of images, and even on bad snapshots they did a good job; as in Photoshop, often it was far easier to allow the auto-balance functions to get most of the way there and then fine-tune the end results by hand than to do it all completely by scratch,
The filters (right-click, filters) are impressive, and grouped well. In the 'enhance' menu, I found that the unsharp mask works particularly well. There's some fun effects available in the highly-customisable (some might think, over-customisable) dialogue box for the GIMPressionist for instant birthday cards etc.
The end-result of these filters is as professional as those in Photoshop, but Photoshop allows much better previewing facilities, including showing a series of thumbnails of how your image can look with varying amounts of colours and saturation, for example. The GIMP doesn't appear to offer this; often it's trial and error, with liberal application of the 'undo' option from the edit menu.
![]()
![]()
![]()
Bruce Lawson
 I'm the brand manager of glasshaus, a publishing company specialising in books for web professionals. We've a series for dreamweaver professionals - the dreamweaver pro series.
Comments
Be the first to write a comment
You must me logged in to write a comment.