Configuring Apache 2 and PHP 4 for Windows
This tutorial is designed to help you set up a server environment for using PHP with Dreamweaver on a Windows platform. The tutorial recommends using the Apache Web Server, Windows Installer Version, and zipped source code for PHP.
Configuring Apache and PHP for Windows
I use the Apache web server for my PHP web development, even though I develop on Windows using Dreamweaver. I use Apache for a number of reasons.
- I also do ASP development, and find it easier to reserve IIS for ASP alone.
- Apache is easier to configure to work with PHP.
A number of books I have read give different advice on how to configure these systems. All I can do is show you which method works best for me.
Installing Apache
I use the Microsoft Windows Installer version of Apache. Visit the Apache Web Site at www.apache.org. Follow the links to the download page. The current MSI file is
apache_2.0.49-win32-x86-no_ssl.msi
If you intend to continue to use IIS, as I do, you will need to stop IIS before proceeding with the installation. After stopping IIS, locate the msi file and double-click on it. Since you are only using a development server, you can just insert dummy data at every occasion that Apache asks.
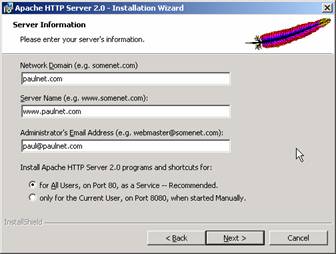
I recommend accepting the All Users, Port 80 option. If we want to use another port, we can set this up later, in the configuration file.
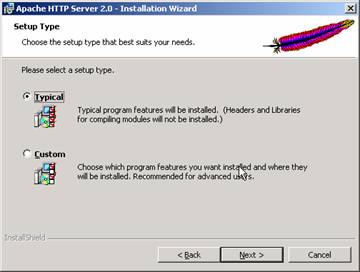
For development purposes, Typical installation should be satisfactory.
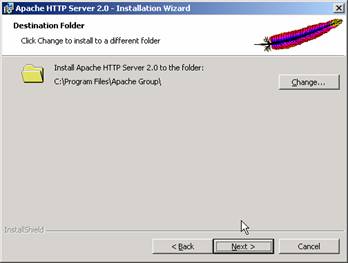
If you wish to install to a different folder, now is your opportunity.
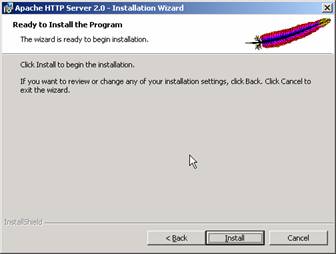
Finally, you are asked to click install. You can now find Apache , as a Windows service, in the Control Panel, under Administrative Tools > Services.
Configuring Apache will be analogous, whatever platform you are on. These instructions will be for a Windows environment. The only changes you will need will be to account for the different way file paths are described on Linux, Mac and Windows.
On all platforms, Apache is configured by a file called httpd.conf. Open this file up in a text editor. (I often need multiple text files, so I use NoteTab in preference to NotePad. NoteTab is free, and is available from www.notetab.com. On Linux (I’m using Mandrake 9.1); I use Quanta, which also permits multiple files open.).
Find the line referring to Listen.
Listen 80
If you are running 2 web servers, change this line to
Listen 8080
If left at 80, you will access the web server at http://localhost. Otherwise, it will be at http://localhost:8080.
Whenever you make a change to this httpd.conf file, you must restart Apache , for it to recognise the changes.
Find the document root statement.
DocumentRoot "C:/Program Files/Apache Group/Apache2/htdocs"
Check it describes the actual position of the web server root. Unix type document roots do not need to be in quotes, but Windows paths work better in quotes. Don’t ask me why! Notice also that the Windows backslashes are rendered as forward slashes.
As with IIS , you could simply place your sites as subfolders of the web root. Thus, C:\Program Files\Apache Group\Apache2\htdocs\mysite would be served as http://localhost/mysite.
As with IIS , it is usually more convenient to have the folders elsewhere. In Apache , this is referred to as an alias.
Search httpd.conf for the word alias. You will see a couple of aliases set by default. The script gives other examples, in the commented lines (any line beginning # is a comment line, and ignored at execution).
Here is a typical alias off my machine.
# permission for malinbooks folder
Alias /malinbooks "C:/webs/malinbooks"
<Directory "C:/webs/malinbooks">
Options Indexes MultiViews
AllowOverride None
Order allow,deny
Allow from all
</Directory>
I have added a comment for each alias to make it easy to find. The Alias command defines the nature of the alias. This is saying that C:\webs\malinbooks will be served as http://localhost/malinbooks. The information in the Directory tags sets the permissions.
We can enter
# permission for phpbattybooks folder
Alias /phpbattybooks "C:/webs/phpbattybooks"
<Directory "C:/webs/phpbattybooks">
Options Indexes MultiViews
AllowOverride None
Order allow,deny
Allow from all
</Directory>
As usual, after any changes, save httpd.conf, and restart Apache .
Installing PHP
I have attempted this, in a number of ways, and have become convinced that it is easiest to download the whole package zipped, rather than use the Windows Installer.
PHP is obtained from www.php.net, where you will find detailed instructions on installation, which is not difficult.
Under Windows, follow these instructions.
- Stop Apache
- Download zip file, rather than win installer. Php-4.3.1-Win32.zip
- Extract contents to C:\php
- Copy php.ini-dist to your Windows directory – Windows in XP, WINNT in 2000. Rename it as php.ini
- Copy php4ts.dll from C:\php to C:\Windows\System32
- Edit php.ini in a text editor, as shown in the next few lines
- Find the line extension_dir = ./
- Amend to extension_dir = "C:\php"
- Find line doc_root = ./
- Amend line to doc_root = "C:\Program Files\Apache Group\Apache2\htdocs"
- Find line session.save_path = ./tmp
- Amend line to session.save_path = "C:\tmp"
- Make sure that the folder "C:\tmp" exists, or use another folder in the php.ini file.
- Save and close php.ini
- Open httpd.conf in text editor
- Look for lines beginning LoadModule
- Add these lines
LoadModule php4_module “C:/php/sapi/php4apache2.dll”
AddType application/x-httpd-php .php
- Save file
- Start Apache
The next job is to test that php is working. Create a file in a text editor, or Dreamweaver. Fill it with this code:
<?php
phpinfo();
?>
Save the file into the root of the Apache web server, as phpinfo.php. Call the file up in your browser, e.g. as http://localhost:8080/phpinfo.php When you do this, you should see a page of information about PHP. This will show that your installation is working. If you do not get such a page, check all the steps above very carefully.
You should now have a good working development server on your Windows machine.
Happy Developing,
Paul Taylor
Paul Taylor
 Born in 1961, I am a middle-aged amateur web developer. I did this professionally for 5 years. Before that I spent 17 years as a schoolteacher. I now work as a writer for the international Christian ministry, Answers in Genesis.
Comments
Easier Way....
I used an installer that installs apache, php 5, phpmyadmin, sql-lite and some other stuff. I use it for doing php/mysql development with Dreamweaver. Install was quick and easy and it works. http://www.en.wampserver.com/
RE: Easier Way....
Thanks Chris
I've heard of this installer, and will go and find out more about it. I'm very happy if there is an easier way.
Paul
Configuring Apache 2 with PHP
This was a great help in configuring Apache 2 with PHP, in my case PHP 5. One comment that would make is that I had trouble with the path LoadModule php4_module “C:/php/sapi/php4apache2.dll” The PHP 5 version that I installed did not have a sapi folder. The alternative was to go this route LoadModule php5_module “C:/php/php5apache2.dll” which worked fine.
Great job Paul,
Bob Boisvert..SarJen Web Design
using index.php
I have been searching the net for good guides covering this, and felt lost untill I stumbled across this easy, quick and, as of my opinion, the best tutorial on Apache / PHP configuring.
However, as I, as probably several others, are working with PHP here, we would most likely want the Apache server to use index.php as the first-choice index format.
Open httpd.conf and search for the line saying
DirectoryIndex index.html index.html.var
Replace this line with the following:
DirectoryIndex index.php index.html index.html.var
You must me logged in to write a comment.