Advanced Multi Uploader for Flash

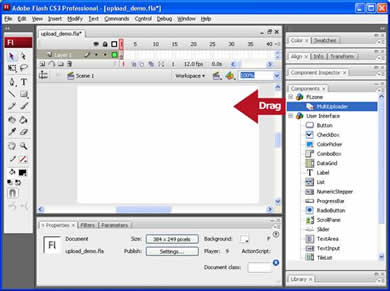
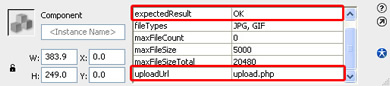
Use Advanced Multi Uploader for Flash to allow full file management and multiple secure uploads for all your Flash projects in just a few 
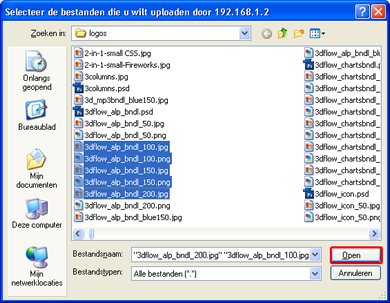
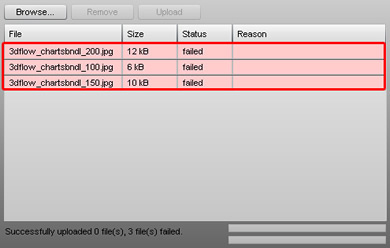
clicks! Use the easy browsing feature for the selection of files to 
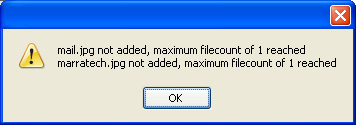
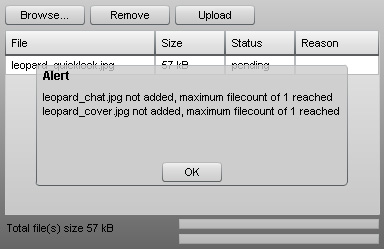
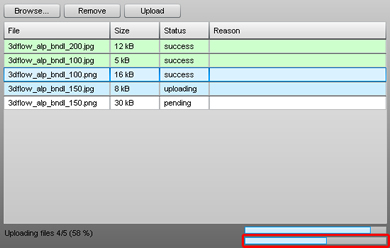
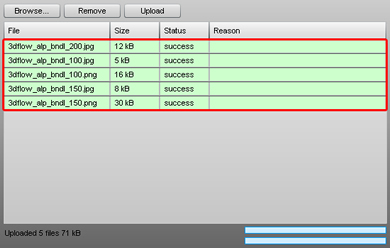
upload, automatically generate a clear overview and advanced status report with progress bars and the condition of the selected files. Optionally remove files from your overview or upload queue and customize it to any site design.

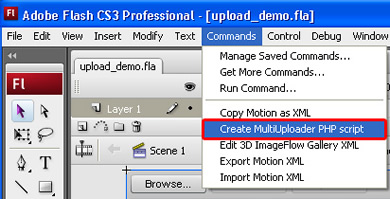
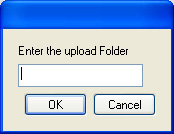
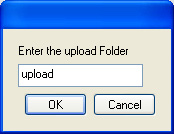
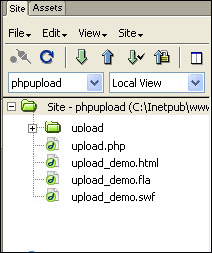
The extension uses the latest Flash 9 technology and weighs less then 60kb and comes with its own PHP script generator for uploading files.

This extension is build for the Flash IDE and is designed for building Flash Applications. There is also a Dreamweaver version that is build for use in Dreamweaver websites.

Publishing The Upload Component On Your Page

  1. Create a new Flash document
    Create a new or open an existing Flash Action Script 3 document and save the page.

  2. Applying the extension
    Choose the  icon from the Components window and drag it onto your stage:


    Select the component preview that is now visible on the stage and switch to the parameters tab in the property inspector:


  3. Setting the parameters
    We'll set the browserAlert parameter to false to show alerts in the Flash movie rather than using alerts from the browser.


    browserAlert set to true


    browser Alert set to false

    If the used uploadUrl gives back a certain result after upload, you can set it in the expectedResult. If the result from the upload is not the exprectedResult then the upload will be marked as failed.


    You can set the fileTypes to restrict the user to use  certain filetypes, we set it to JPG and GIF, the extensions are separated by a comma, so the exact value will be JPG, GIF.


    If you use another standard HTML form, set its name in the formName parameter so the content of its fields will also be uploaded with each file. We'll leave it empty.


    We leave maxFileCount to 0 this means there are no restrictions to the maximum number of uploaded files.


    We set maxFileSize to 5000 which means the files that are uploaded must be smaller then 5mb (approximately as 1MB is 1024 KB). Sizes are in KB.


    We set the maxFileSizeTotal to 20480 which means the files that are uploaded must be smaller then 20 MB. Sizes are in KB.


  4. Creating the MultiUploader PHP script
    Our Multi Uploader component needs a PHP (or a custom upload script) to be able to upload it's files. To add a PHP script, go to the Commands menu and select Create MultiUploader PHP script.


    The following popup appears:


    Important: Read the Setting the folder security on your server tutorial to set the appropriate security settings to your upload folder.

    Enter the name of our upload folder in the entry field  (use a relative path) on your server and press OK. This creates a PHP file in the same folder as your FLA movie.


    Below is an example of our folder structure. 


    Here is a short explanation of our folder structure:

File

Description

upload folder

generated upload script

Generated HTML file

Flash Document (you don't have to upload this file)

the Flash Movie

This will automatically set the uploadUrl that specifies the upload folder. It will also update the expectedResult parameter.


  1. Testing the upload
    Before you test make sure that you:
    1. Published the Flash movie and upload the files to your website together with the related files, in our example this is the PHP file.
    2. Created an upload folder on your site that has the correct security settings (read setting the folder security on your server for more information).

      Open the page that contains the Multi Uploader component on your website as it won't work locally:


      Press the Browse… button to select the files you want to upload and press the Open button.


      The files will be displayed in the Multiple Upload screen.


      You can select individual files and optionally delete them with the Remove button, we won't do this now as we want to upload all files that we selected earlier with the Browse… button. Press the Upload button to upload your files. If you wish you can remove files from the upload cue with the Remove button but we won't do this now. The upload progress is indicated by the two status bar on the bottom right.

      The top one displays the progress of the current file upload.


      The bottom bar shows the total progress of all file uploads.


      After the files are uploaded successfully they are marked green and the Status is set to success.


      If the uploads failed then proceed to the following step in the manual.


      Optional Step; Validating Your Upload folder Settings
      Upload the upload.php file that is generated in the commands menu when you select the Create Multi Uploader PHP script, to your server. Make sure you have uploaded the swf file. Open the upload.php file in your browser. You should see the following basic field:


      Select a file with the Browse… button and press the Upload button to upload it.

      If the response it OK then the upload is successful, make sure you have uploaded all the files and your paths are correct. Otherwise you'll get an error message with the cause of the problem. You can send this to our support department.

      If you encounter write errors this is often caused by incorrect server settings, make sure you have read the setting the folder security on your server tutorial to solve these issues.

George Petrov

George PetrovGeorge Petrov is a renowned software writer and developer whose extensive skills brought numerous extensions, articles and knowledge to the DMXzone- the online community for professional Adobe Dreamweaver users. The most popular for its over high-quality Dreamweaver extensions and templates.

George is also the founder of Wappler.io - the most Advanced Web & App Builder

See All Postings From George Petrov >>

Comments

Be the first to write a comment

You must me logged in to write a comment.