Learn how to dynamically populate a dropdown list from the selection made in another dropdown list. This can be done straight from Ultradev without even having to go into the source.
Dynamic Dropdown Lists
Dynamic Dropdowns: Dynamically populate a dropdown list from the selection made in another dropdown list.
Note: This is an update to an earlier tutorial that used 2 pages to accomplish the same task, this version only uses 1 page and is just as simple if not simpler to use.
PLEASE NOTE : THIS TUTORIAL IS FOR ULTRADEV 4, FURTHER HANDCODING IS REQUIRED TO ACHIVE THE SAME RESULTS IN DREAMWEAVER MXThis tutorial demonstrates a fairly simple way of creating dynamically populated dropdown list menus. A very small amount of handcoding is required, but 99% of this can be done straight from Ultradev without even having to go into the HTML/ASP source.
The Table Structure
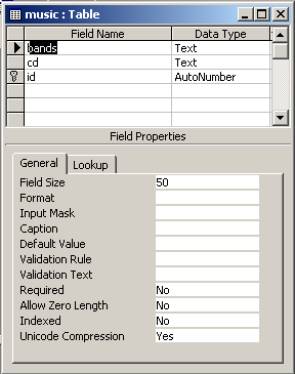
First create a table on which to base your drop down menus. This example is
using a CD catalog, you only need 2 columns in your table to represent the main
category and sub-category for your data. Here I'll use Band
and CD,
I have also included a primary key ID (autonumber) but
this is not needed, I just always put one in just in case it’s needed later.
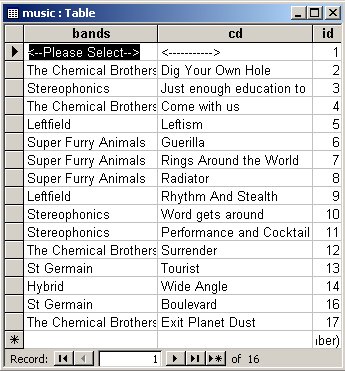
Sample Table Contents.
Notice the first record <--Please Select--> this will be used later on as the default value of the list box when you open the page. You can use one of your other categories if you like but this value will be hard coded into the page so make sure it is not a category that will be changed.
The UltraDev Part
Ok that’s it for the database, on to UltraDev:
- Open up a new page and
insert a form I have called my page listbox.asp
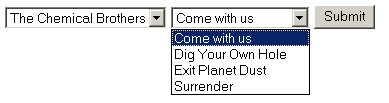
- In that form add a jump menu;
- In the jump menu dialog leave things as they are, except for
the check box at the bottom ‘select first item after url change’, check this
box. Yes that’s right! Leave the value for the first Menu item 'unamed1' as
it is, don’t worry we will change this in a minute.
- Now insert a list/menu next to the jump menu and a submit button.
At this stage you should have something like this:
Now it’s time to sort out that first jump menu.
- First we need a Recordset. Switch to the advanced SQL view and enter these
settings:
Name: rsBands
Connection: tuts (select your own connection of course)
SQL: Select DISTINCT bands FROM music
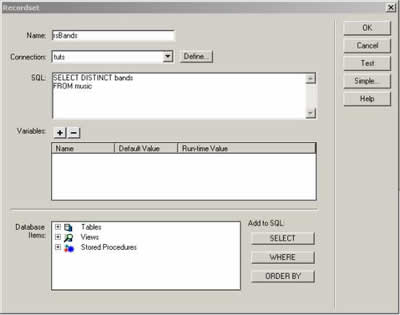
The SQL keyword DISTINCT is used to select values from the database only once
no matter how many times they are actually stored. At this stage we only want
the bands, we are not worried about the CD’s in this recordset. Clicking test
should give you something like this:
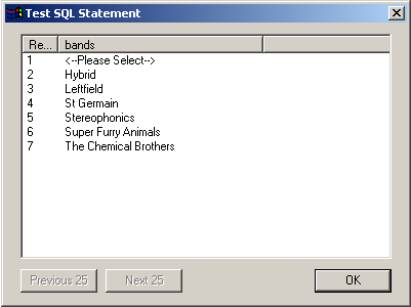
Notice how they are automatically sorted, this is a side effect of the DISTINCT
keyword, also because we have added <-- in front of the please
select record it appears at the top of the list.
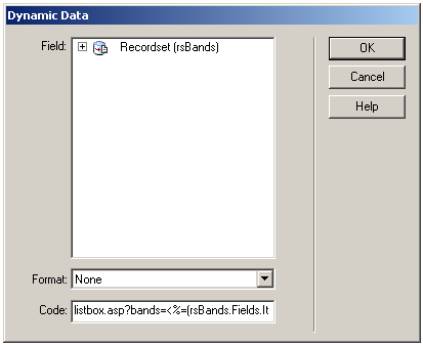
- Next we need to put this recordset in the dropdown, so select
the dropdown and from the Properties Inspector click the List Values button.
Click the lightning symbol next to ‘unnamed1’ under the Item Label column
header and select 'bands' from your recordset.
- Now click into the Values column and click the lightning symbol again and select 'bands' again, Here we need to edit the code. We are going to add the file name; listbox.asp and a ? tag. The code to add is listbox.asp?bands= so the dialog will look like this:
Now its time to fill in the second box, the list menu.
- The next thing we need on our page is another recordset. We
can start this one from the simple style dialog:
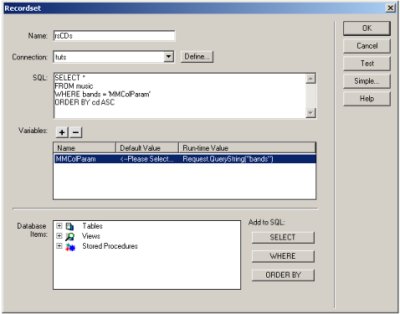
- Name: rsCDs
Connection: tuts (select your own connection of course)
Table: music
Columns: All
Filter: bands = URL Parameter 'bands'
Sort: CD Ascending (optional)
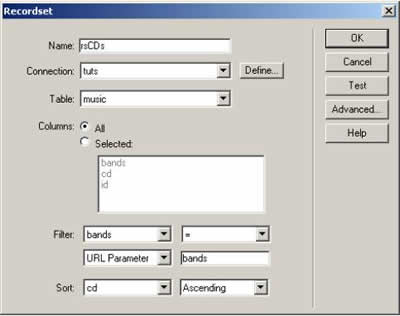
Once you have set this up click the advanced button where we need to make one simple change, we need to set the default value of MMColParam to <--Please Select--> make sure you type it exactly the same as it is entered in your database.
Now its time to fill in that second list menu.
- Again go in to List Values (after selecting that second list
menu).
- This time select the lightning symbol and select cd from your second recordset
for both Item Label and Value. However there is nothing stopping you selecting
a different field for the value (I knew that ID I put the database would come
in handy somewhere).
You should now be able to select a band from the list and a list of CD’s will
appear in the other list.
However something strange is happening the selected band is being replaced with
the <--Please Select--> again, so lets fix that.
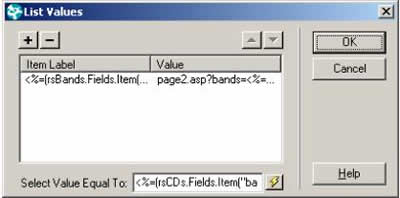
- Click on the first jump menu and from the Properties Inspector
click List Values again.
- This time at the bottom of the dialog box click the lightning symbol next to the ‘Select Value Equal To’ text box and choose bands from the second recordset (which is named rsCDs).
And that’s about it. You can make it do something useful like submit to a database, but that’s up to you.
Oh yeah! Did I said hardly any hand coding needing I think that should read
no handcoding needed so you don’t need to go into the HTML/ASP at all,
sorry if I scared you, but your gonna have to do it one day.
Comments
thanks
Works great with one exception...
I did notice that Dreamweaver MX does not retain the code change in the dialogue box (listbox.asp?bands=) so the page would not work. When I added this code manually it worked fine. Ultradev4 retained the code change.
Remove excess parameters
For those of you who have been trying to remove excess parameters from the values submited by the jump menu, here's what you do...
Rather than place "listbox.asp?bands=" in the value feild, go up to the head of the code, and find the jump box script. Then put in listbox.asp?bands= right after the part that says .location='
It will look like this (hope code posts right...):
<CODE>
function MM_jumpMenu(targ,selObj,restore){ //v3.0
eval(targ+".location=listbox.asp?bands="+selObj.options[selObj.selectedIndex].value+"'");
if (restore) selObj.selectedIndex=0;
}
</CODE>
Hope this helps!
What about with Coldfusion
You must me logged in to write a comment.