
This chapter will show you how to create horizontal or vertical text, text fields that bring in text from an external document, make text scroll, and create text fields where someone can enter information themselves.
This sample is taken from Chapter 12: "Working with Text" of the glasshaus title "Flash MX H.O.T"


5. Working with Input Text
Some projects that you develop in Macromedia
Flash MX will require that the user be able to enter a special code or password
in order to gain access to a web site. The following steps will show you how
to use Input Text blocks and check whether the user has entered a correct
user name and password. This exercise will teach you what Input Text is and
how it differs from Dynamic or Static Text.
1. Open the inputText.fla file from the chap_12 folder.
Notice that this file has one layer with a background image on it.
2. Click the Insert Layer button and add five new layers
above the background layer. You will be adding content, actions,
and labels to these layers in the next few steps.

12_05_01
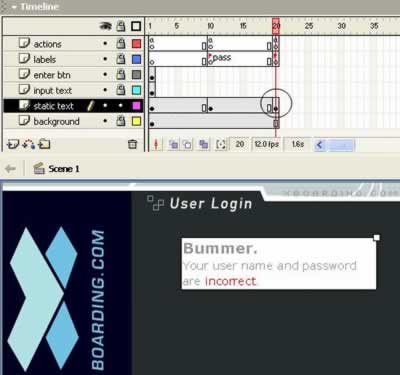
3. Name the layer above the background layer static text. Continuing
from bottom to top, name the remaining layers input text, enter
btn, labels, and actions, respectively. Your layers should
look like the picture above.
12_05_02
4. Select the static text layer and, with the Text tool,
add three Static Text boxes, one at a time, to the Stage.
In the first text block, add the text Welcome. Please enter your user
name and password. In the second block, add the text user name:.
In the third block, add the text password:. Your Stage should look
similar to the picture above. Feel free to use any character attributes
you wish for each of these Static Text boxes (font, font height, etc.).
12_05_03
5. In the Property Inspector, make sure the Text Type
option is set to Static Text (the default setting) for each text
block. Lock the static text layer to avoid editing anything on that
layer by accident.
12_05_04
6. Click on the input text layer to select it. Select the Text
tool. In the Property Inspector, choose Input Text for
the Text Type. Create a text box to the right of the user name
text on the Stage.
12_05_05
7. Using the Arrow tool, select the Input Text box on the Stage.
In the Property Inspector, choose Input Text and select black
for the Font Color and Single Line for the Line Type.
Click the Show Border Around Text button, and set the Maximum
Characters to 20. In the Var field, type the word name
to give this Input Text box the variable name name. The Property
Inspector should look just like the picture above.
According to the ActionScript Coding Standards, variable
names can contain only letters, numbers, and underscores. However, when
you name variables in Macromedia Flash MX, they should begin with a lowercase
letter and cannot begin with numbers or underscores. Additionally, words
that are used by ActionScript, such as scroll, should not be used as variable
names.
8. Make sure you still have the input text layer selected and,
using the Text tool, create a text box to the right of the password
text on the Stage.
12_05_06
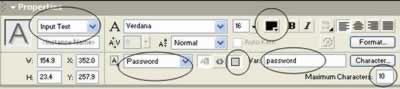
9. Using the Arrow tool, select the Input Text box on the Stage.
In the Property Inspector, choose Input Text and select black
for the Font Color and Password for the Line Type. Click
the Show Border Around Text button, and set the Maximum Characters
to 10. In the Var field, type the word password to give
this Input Text box the variable name password. The Property Inspector
should look just like the picture above.
12_05_07
10. Lock the input text layer and select the enter btn layer.
Open the Library and, with the enter btn layer selected, drag
an instance of the btnEnter symbol onto the Stage. When you
are finished, lock the enter btn layer so you don�t accidentally
edit anything.
12_05_08
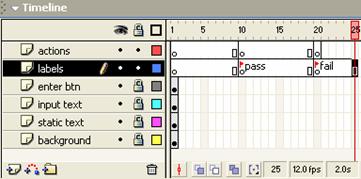
11. On the labels and actions layers, add a keyframe (F6)
at Frames 10 and 20.
12_05_09 and 12_05_10
12. Select Frame 10 on the labels layer. In the Property
Inspector, type pass in the FrameLabel box. Select Frame 20 on the labels layer and
type fail in the Frame Label box in the Property Inspector.
12_05_10b and 12_05_10c
12_05_10d
12_05_11
13. On the actions layer, add a Stop frame action (in the
Actions panel, choose Actions > Movie Control > stop)
to Frames 1, 10, and 20. When you are finished, lock
the labels and actions layers.
14. Select Frame 20 on the background layer and press F5
to add frames. This way you will be able to see the background of the movie
for all of the frames.
12_05_12
15. Unlock the static text layer and add a blank keyframe (F7)
to Frames 10 and 20. On Frame 10 of the static text
layer, create a Static Text box that reads Enjoy the ride! Your user
name and password are right on the money. On Frame 20 of the
static text layer, create a Static Text box that reads Bummer.
Your user name and password are incorrect. Don�t forget to select Static
Text in the Property Inspector for both of these new text blocks.
Feel free to adjust the settings in the Property Inspector, such as font
name and font color. When you are finished, lock the static text
layer.
12_05_13
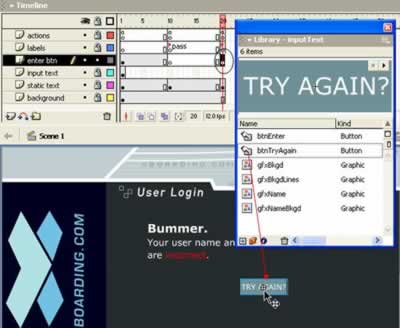
16. Unlock the enter btn layer, and add a blank keyframe on Frames
10 and 20. Select Frame 20 and drag an instance of the btnTryAgain
button onto the Stage, as in the picture above.
17. With the enter btn layer still unlocked, click on the Enter
button on the Stage in Frame 1 to select it. Choose Window
> Actions or press F9 to open the Actions panel if
it is not already open.
12_05_14
18. In the Actions panel, choose Actions > Movie Control and double-click on
the on action to add it to the Script pane. Select the events
Release and KeyPress. As soon as you select the KeyPress
event, notice that your cursor is blinking in the empty field next to this
option. Press the Enter button on your keyboard. This will add
<Enter> to the empty field for you.
12_05_15
19. Choose Actions > Conditions/Loops > if and double-click
on the if action to add it to the Script pane. In the Condition
field, type the following: Condition: (name ==''kymberlee'') &&
(password == ''gotSnow''). Your Script pane should look similar to the
picture above.
12_05_16
20. Choose Actions > Movie Control > goto, and double-click
on the goto action. For Type, select Frame Label; for
Frame, select pass from the drop down menu; and select Go
to and Stop. This will tell Macromedia Flash MX that if the user name
and password are correct, it should go to the frame labeled �pass.�
21. Choose Actions > Conditions/Loops > else and double-click
on else to add it to the Script pane. Then choose Actions
> Movie Control > goto and add goto to the Script pane. For
Type, choose Frame Label; for Frame, type fail;
and select Go to and Stop. This tells Macromedia Flash MX that if the
user name and password are not correct, it should go to the frame labeled
�fail.�
This is what your ActionScript
should look like:
on (release, keyPress "<Enter>") {
if ((name =="kymberlee") && (password =="gotSnow"))
{
gotoAndStop("pass");
} else {
gotoAndStop("fail");
}
12_05_17
22. In Frame 20, on the enter btn layer, select the TryAgain? button on the Stage.
In the Actions panel, choose Actions > Movie Control > on
and double-click on the on action to add it to the Script
pane. Select the event Release. Choose Actions > Movie Control
> goto and add goto to the Script pane. For Type,
select Frame Number; for Frame, type 1; and select
Go to and Stop. This tells Macromedia Flash MX that when the user
clicks on the button and releases the mouse, it should go back to Frame
1 and stop.
23. Select
Control > Test Movie to preview the movie.

12_05_18 and 12_05_19
If you type in the user name and password correctly,
you will get the Enjoy the ride message.
12_05_20 and 12_05_21
If you type in the user name and password incorrectly,
you will get the Bummer message.
24.
When you are finished, save and close this
file.
 George Petrov is a renowned software writer and developer whose extensive skills brought numerous extensions, articles and knowledge to the DMXzone- the online community for professional Adobe Dreamweaver users. The most popular for its over high-quality Dreamweaver extensions and templates.
Comments
asdf
great!!
Perfect to start working with text.
It was so helpful to me.
But I get and error in the username/password example. If somebody can give a hand i will very greatful.
It seems everthing is ok, but it doesn't verify the password , whatever I write I go always to frame 10 (pass) and never reach the frame 20 (fail). :-) thank you
nice tutorial...but...
Multiline Text
Indeed, this is very useful information. I apologize if this is not the correct forum for asking questions. But I have the same problem as Stefaan. How do you keep a mulitline text box from starting a new line with a space character? It's very annoying besides ugly. Thanks.
You must me logged in to write a comment.