Fireworks MX Tutorial :: Quick Circular Slice
Fireworks MX Tutorial :: Quick Circular Slice
This tutorial demonstrates a quick solution to creating a circular Slice without having to draw the circle point-by-point with the Polygon Slice Tool.
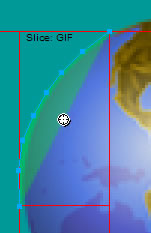 |
Introduction :: Polygon Slice ToolTo create a Slice for a circular object, you would normally select the Polygon Slice Tool and create the Slice point-by-point, as seen in the image to the left. Unfortunately, this can become very tedious; especially when dealing with large objects. In this tutorial, the goal is to Slice a circular portion of an image so it can be compressed and exported as a higher quality JPEG image while the rest of the image can be exported as lower quality GIF images. Instead of doing things the hard way by drawing a circular Slice with a series of points, we will do it in 3 short steps. |
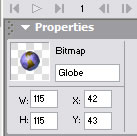 |
Step 1 :: PreparationFirst, select your object using the Arrow Tool and make a note of its dimensions and position in the document. As indicated on the left, our object is 115x115 pixels in size and located 42 pixels from the left and 43 pixels from the top of our document. |
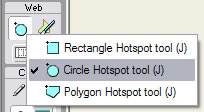 |
Next, press and hold the Hotspot button in the Tools Panel and select the Circle Hotspot Tool when the drop-down menu appears. |
 |
Step 2 :: Create a HotspotWith the Circle Hotspot Tool, draw a Hotspot over the object. The size and position is not important as we will adjust these settings next. |
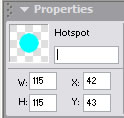 |
Using the settings we noted from our original object, change the width, height, x-position, and y-position settings in the Properties Panel, for the Hotspot. |
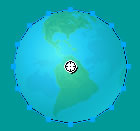 |
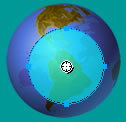
Your Hotspot should now look like this. |
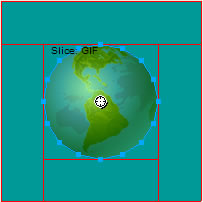 |
Step 3 :: Create the SliceWith the newly created Hotspot still selected, let's turn it into a Slice. We can do this in one of two ways: 1. From the Edit Menu select Insert and then select Slice, or 2. Press the Alt + Shift + U keys. The final product should look like the image on the left. |
Conclusion :: Using the Slice
Now that we have created our Slice, we can do whatever we want with it. Since the goal of this tutorial is to export our object at a higher quality than the rest of the image, simply change the Settings in the Optimize Panel to JPEG - Better Quality, and we are set. When the document is exported, the designated object will be exported as a JPEG image while the rest of the document is exported as GIF images.
Note: It is important to note that when exported as HTML, included in the code will be an image map for this slice. Though it will not cause problems, it will cause the slice to display hyperlink properties on the page. To stop this, simply open the generated code in a text or HTML editor and remove the image map code.
Comments
Be the first to write a comment
You must me logged in to write a comment.