Overview
Introduction:
In our everyday work, it is very hard to meet with everyone in person because of our busy schedules. To resolve this problem, E-mails helped us a lot to communicate with our clients, friends, colleagues etc. Now millions of people are using emails and can’t live without them. It would be great for all webmasters to have an application that will let them send audio/video messages to their clients and friends. Further more, it will also enhance your reputation as a person/company who is using the current trends of technology &communication.
In this article, we are going to make an audio/video messaging application that will allow you to send audio/video email messages to anyone in the world. The problem is that many users use email clients that do not support multimedia contents other then simple images.
The main benefit of your application is that it will store all messages on your server and won’t send those messages as attachments. Instead a link to the message will be send to the receiver so that he can easily watch & listen to your message. In addition to this, neither sender, nor receiver has to download any plug-in or software to receive the message as the entire message will be broadcast using Macromedia Flash Player that is already installed on almost all the computers that are connected to internet. According to News.com’s survey report, Macromedia Flash Player is installed on 98% of computers that are connected to internet.


Writing ActionScript to bring life to our application:
Open the "MessageSender_raw.fla", select the first frame of Global Layer, launch the Action panel by pressing F9 and add this code to the first frame of Global layer:
/*Create a string variable called uName that will hold the username of the current user, set the initial value of this variable as blank*/
var uName:String = ";
Select the Proceed button that is located on the first frame of content layer, while the proceed button still selected, write this code in the action panel:
/*detect the click event, when some one will click this button then flash will trigger this code*/
on(click){
//set the value of uName (a variable on Global layer) to the value of username textfield
_root.uName = _root.username.text;
//move the movie to next frame;
_root.gotoAndStop(2);
}
Now, select the frame 2 of AS Layer, write this code in the action panel:
//stop the playback of movie from moving forward
stop();
/* Show welcome message to the user using the value of uName on Global layer*/
welcome.text = "Welcome " + _root.uName + "!";
/*
Create a date object that will help us in creating a unique file name for recorded message
*/
var dt:Date = new Date();
/*
It is possible that the moment you are recording the message, some one else is also recording his message as well, since we are not using any authentication & login process before starting the movie, so two or more person can login with the same name or their file name may collid so in order to avoid this collision of names, we have to adopt such a method that will prevent this problem, for this, we will initiate a new variable called msgID that will collect the username & add some random numbers & it will also add some information from the previousely created date object, & will finaly create such a file name that will minimize the possiblity of collision of names two or more files.
*/
var msgID:String = _root.uName +Math.round(Math.random(50))+ dt.getMilliseconds()+ dt.getFullYear() + dt.getSeconds() + Math.round(Math.random(500));
/*
trace out the newly generated msgID
*/
trace(msgID);
//initiate camera object
var yourCamera:Camera = Camera.get();
//initiate the microphone object
var yourMic:Microphone = Microphone.get();
/*the URL to the messaging application
rtmp: means Real time messaging protocol is the default protocol for connecting flash player with macromedia
flash communication server
yourserver means the name of your server that runs flash communication server, suppose flashcom.yourdomain.com or yourdomain.com, since I was developing it locally(means both flash com & my webserver are on same machine, so I am using localhost instead of domain name
/avMessages is actually the name of our application, you may have remeber that we created a directory of this name
under the flashcom’s application folder, so it is representing that directory.
/myVideoMsgs is the name of instance, although it is not necessary but it is always better to use some
specific instance name instead of default instance name
*/
var serverUrl:String = "rtmp://yourserver/avMessages/myvideoMsgs";
/*Attach your camera’s output to the video object on main stage*/
myDisplayBox.attachVideo(yourCamera);
//create a new net connection instance
var yourNetConn:NetConnection;
/*
create an instance of outgoing stream, this will be responsible for saving the data*/
var outgoingStream:NetStream;
/*
create an instance of incoming stream, this will be responsible of previewing
the recorded message
*/
var incomingStream:NetStream;
/*
This function will bring the application in ready to use state
*/
function initApp() {
//initiate your netconnection object
yourNetConn = new NetConnection();
/*
connect your netconnection object to the flash com server where _root.serverUrl is
a the url that we set above
*/
yourNetConn.connect(_root.serverUrl);
/*
this event handler envokes when a response returns from the flash com server, the
response may be a success message or failure message.
*/
yourNetConn.onStatus = function(info) {
/*
trace the response of server, here info.level means the response type, either
success or failure & info.code means the detailed result
*/
trace("Level: " + info.level + " Code: " + info.code);
}
/*
connect the outgoingStream to your net connection object
*/
outgoingStream = new NetStream(yourNetConn);
/*
connect the incomingStream to your netconnection object
*/
incomingStream = new NetStream(yourNetConn);
}
// call the above function so that the application will be ready to use
initApp();
/*
this function will be envoked when the user would like to record a new message
this function will also invoke when the user want to stop the recording, the difference
in working of this function in both situations will depend upon the label of the Record_btn
instance at the time of clicking
*/
function startRecording() {
/*
if at the time of clicking the button, the label is Record, then perform the recording of messages
*/
if (Record_btn.label == "Record") {
/*
attach your camera and microphone’s output to the outgoing Stream so
that it will record the audio from your mic & video from camera
*/
outgoingStream.attachVideo(yourCamera);
outgoingStream.attachAudio(yourMic);
/*
this method starts sending the stream to server, the first argument of this method
is the name of the clip that is going to be recorded, the 2nd argument represents
what type of stream is this, if the value of 2nd argument is "record"(as in this case)
then flash will save the recorded stream in your application’s streams folder & will
name that file equals to the value of 1st argument
*/
outgoingStream.publish(_root.msgID, "record");
/*
Disable the preview button so that the user won’t be able to play the stream while recording
*/
Play_btn.enabled = false;
/*
Change the label of the button from Record to Stop
*/
Record_btn.label = "Stop";
}
/*
Else if at the time of clicking the button, if the label is Stop then it means, the user
was actually recording a message & now he/she wants to stop the recording
*/
else if (Record_btn.label == "Stop") {
/*
Stop the recording by stop sending the outgoing stream to the server
*/
outgoingStream.close();
/*
Enable the preview button so that the user can now preview his/her newly recorded message
*/
Play_btn.enabled = true;
/*
Reset the label of the button so that the user can record a new clip
*/
Record_btn.label = "Record";
}
}
/*
This function will be envoked when the user want to play/pause/stop previewing the
newly recorded clip
the difference in working will be according to the argument supplied to this function
*/
function doPlay(mod:String) {
/*
check the value of argument & do the respective job
*/
switch(mod){
case "Preview"://if argument is play then start playing the stream
/*
attach the incomingStream to the myDisplayBox (the video object on stage)
*/
myDisplayBox.attachVideo(incomingStream);
/*
start playing the recorded clip
*/
incomingStream.play(_root.msgID);
break;
case "Pause"://if the user wants to pause the stream then pause that
incomingStream.pause();
break;
case "Stop"://if user wants to stop previewing the stream, then close it
incomingStream.close();
/*
retain the movie in original states & attach your camera to the video object
*/
myDisplayBox.attachVideo(yourCamera);
break;
}
}
Testing the Movie:
Test your movie now by pressing CTRL+ENTER. You will see this dialogue box:
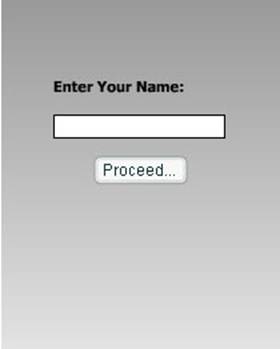
Enter your name is the name field & press the proceed button. Now you should see the following screen:
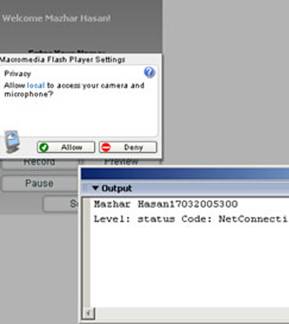
This screen is showing the flash player’s security dialogue box, It is telling you that you are about to share your camera & microphone with this application, so are you going to allow this? Press the Allow Button. Here in the above picture, you can also the output panel. It is showing your message id or the file name of your message & it is also showing you the status of your connection with flashcom server.
Once you have pressed the allow button, you will be watching something like this:
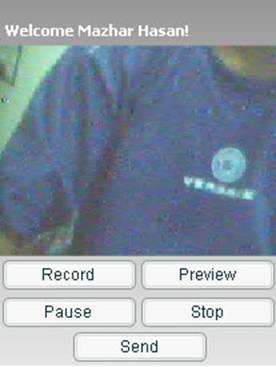
Click on the Record button, your message will start recording, press the same button again to stop recording, now click on the Preview button to see your recently recorded message. If you didn’t liked that, press the record button again & the new recording will replace the previous one.
Close your movie, now browse to:
C:\Program Files\Macromedia\Flash Communication Server MX\applications\avMessages\streams\myvideoMsgs\
There you will see an FLV file having a name similar to the file as shown in following figure:
Conclusion!
This concludes the first part of a two part series. In next episode, we’ll write the server side code to send the mail to the receiver. In Addition to this, we will also create the receiver application. For any information, feedback, questions, please mail me on smazherhq@gmail.com.