

Building the Calendar
In this section were going to start building the calendar that will display a single month, which we will expand upon in the second part of this tutorial. Create a new PHP page in Dreamweaver MX, and save it as single_month.php.
Displaying the current month
There are two steps to creating the calendar, creating the HTML and then making it dynamic. It always helps to create a mock up in plain HTML of how you want the end result to look, and then you can create your dynamic PHP that creates the actual HTML. Using this method means its much more likely that your code creates valid HTML, as there's less chance of forgetting closing tags etc.
Creating the HTML
To create the calendar we'll use two tables. The first table is the outer frame and has 2 rows and 1 column, in the example below the table is 280 pixels wide. In the bottom row, there is another table with 6 rows and 7 columns, each column being 40 pixels wide (40 x 7 = 280 pixels)
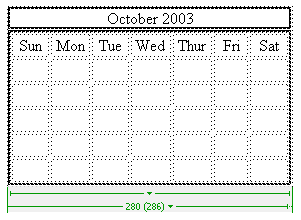
Figure 1 – Example HTML layout
Now that we have the HTML structure created, we can use PHP to automatically generate the HTML code needed, and to fill in the date dynamically.
Creating the PHP
The first step to creating the PHP is to create the basic table layout. To do this, an easy way is to copy and paste from your HTML calendar code, and convert it to be outputted through PHP. Because of the amount of code that will be dynamic in this example, it's easier to generate the whole calendar using PHP, rather than inserting PHP into the HTML.
At the moment, we just need the basic layout, so we can leave out the rows that will contain dates as we'll add them next. The code below is shown as an example:
<?php
echo "<table width='280' border='1'>\n";
echo "<tr>\n";
echo "<td align='center'>October 2003</td>\n";
echo "</tr>\n";
echo "<tr>\n";
echo "<td>\n";
echo "<table width='280' border='0' cellspacing='2' cellpadding='2'>\n";
echo "<tr align='center'>\n";
echo "<td width='40'>Sun</td>\n";
echo "<td width='40'>Mon</td>\n";
echo "<td width='40'>Tue</td>\n";
echo "<td width='40'>Wed</td>\n";
echo "<td width='40'>Thur</td>\n";
echo "<td width='40'>Fri</td>\n";
echo "<td width='40'>Sat</td>\n";
echo "</tr>\n";
echo "</table>\n";
echo "</td>\n";
echo "</tr>\n";
echo "</table>\n";
?>
Code Block 1 – Creating the basic framework using PHP
When you're creating a table like this using PHP, it makes it much easier to see what's going on if you tabulate the code as shown above to preserve the structure. This makes it much easier to spot if you have missed a closing HTML tag e.g. </tr> and makes debugging much easier.
When this code is viewed in a browser, the following output is displayed.
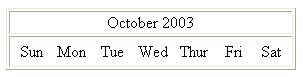
Figure 2 – Basic Layout
Not very exciting at the moment but we have our basic layout in place. We can now expand on this to add the dates that need to be displayed.
The first job we have is to work out which day of the week the first day of the month falls on. We can do this with the following block of PHP, which is placed before our previous code.
$month = date("n");
$year = date("Y");
$firstDay = mktime(0,1,0,$month,1,$year);
$daysInMonth = date("t",$firstDay);
$firstDay = date("w",$firstDay);
Code Block 2 – Calculating the first day of the month and the number of days in the month
First, we use the token "n" which places the current month number in $month, and the token "Y" which represents the year using 4 figures and places it in $year. Next, we need to create a timestamp which corresponds to the first day of the month e.g. $month/1/$year. To do this we use the PHP mktime() command which has the following format:
$timeStamp = mktime(hour,minute,second,month,day,year);
So, to create a timestamp representing $month/1/$year we use mktime(0,1,0,$month,1,$year) which represents 00:01:00 on $month/1/$year. Now that we have a timestamp, we can use it with the date() parameter to see which day of the week it falls upon, which is placed in $firstDay.
Now that we know what day of the week the first of the month falls on, we can put the first in the correct cell of the table.
Finally, we use the date() command again, with the token "t" to find out the number of days in the month. Now we know these two important bits of information we can complete the table containing the dates.
We'll now add the code to create the rest of the table and fill in the dates. To keep things clear, the code for the whole page is shown below. We'll then look at the code parts in sections.
<?php
$month = date("n");
$year = date("Y");
$firstDay = mktime(0,1,0,$month,1,$year);
$daysInMonth = date("t",$firstDay);
$firstDay = date("w",$firstDay);
echo "<table width='280' border='1'>\n";
echo "<tr>\n";
echo "<td align='center'>" . date("F Y") . "</td>\n";
echo "</tr>\n";
echo "<tr>\n";
echo "<td>\n";
echo "<table width='280' border='0' cellspacing='2' cellpadding='2'>\n";
echo "<tr align='center'>\n";
echo "<td width='40'>Sun</td>\n";
echo "<td width='40'>Mon</td>\n";
echo "<td width='40'>Tue</td>\n";
echo "<td width='40'>Wed</td>\n";
echo "<td width='40'>Thu</td>\n";
echo "<td width='40'>Fri</td>\n";
echo "<td width='40'>Sat</td>\n";
echo "</tr>\n";
# Calculate number of rows
$totalCells = $firstDay + $daysInMonth;
if($totalCells < 36){
$rowNumber = 5;
} else {
$rowNumber = 6;
}
$dayNumber = 1;
# Create Rows
for($currentRow=1; $currentRow <= $rowNumber; $currentRow++){
if($currentRow == 1){
# Create First Row
echo "<tr align='center'>\n";
for($currentCell = 0; $currentCell<7; $currentCell++){
if($currentCell == $firstDay){
# First Day of the Month
echo "<td width='40'>" . $dayNumber . "</td>\n";
$dayNumber++;
} else {
if($dayNumber > 1){
# First Day Passed so output Date
echo "<td width='40'>" . $dayNumber . "</td>\n";
$dayNumber++;
} else {
# First Day Not Reached so display blank cell
echo "<td width='40'> </td>\n";
}
}
}
echo "</tr>\n";
} else {
# Create Remaining Rows
echo "<tr align='center'>\n";
for($currentCell = 0; $currentCell < 7; $currentCell++){
if($dayNumber > $daysInMonth){
# Days in month exceeded so display blank cell
echo "<td width='40'> </td>\n";
} else {
echo "<td width='40'>" . $dayNumber . "</td>\n";
$dayNumber++;
}
}
echo "</tr>\n";
}
}
echo "</table>\n";
echo "</td>\n";
echo "</tr>\n";
echo "</table>\n";
?>
Code Block 3 - Complete Code for displaying a Calendar Month
At the moment, we have the basic table constructed, and a row containing the days of the week. We need to now fill in the rest of the rows with the appropriate dates. The first job is to work out the number of rows that our table will need, which uses the code block shown below:
# Calculate number of rows
$totalCells = $firstDay + $daysInMonth;
if($totalCells < 36){
$rowNumber = 5;
} else {
$rowNumber = 6;
}
$dayNumber = 1;
Code to calculate the number of rows needed to display the calendar dates
The number of rows needed depends on two things. First, is the day of the month (if the first day of the month falls on a Saturday, there can be only one date in the first row), and second the number of days in the current month. Either way we will need either 5 or 6 rows, we just need to work out which.
To do this we first add the weekday number (0-6) to the number of days in the month. If the result is less than 36 we can fit the dates into 5 rows (7 * 5 = 35), otherwise we will require 6 rows to show the data. The variable $rowNumber is set to the appropriate number of rows.
Finally, we create a new variable $dayNumber which will hold the current date that we're working on.
Next we have part of the structure shown below:
for($currentRow=1; $currentRow <= $rowNumber; $currentRow++){
if($currentRow == 1){
# Code removed for clarity
} else {
# Code removed for clarity
}
}
Basic structure of the code to generate the calendar roads
This has the code removed from the inner section for clarity. What we are doing is setting up a for loop which will run once for each row of the table that we are creating. Inside that we check if we are working on the first row of the date section or one of the other rows.
First we'll look at the section of code that creates the first row, this block is shown below:
if($currentRow == 1){
# Create First Row
echo "<tr align='center'>\n";
for($currentCell = 0; $currentCell<7; $currentCell++){
if($currentCell == $firstDay){
# First Day of the Month
echo "<td width='40'>" . $dayNumber . "</td>\n";
$dayNumber++;
} else {
if($dayNumber > 1){
# First Day Passed so output Date
echo "<td width='40'>" . $dayNumber . "</td>\n";
$dayNumber++;
} else {
# First Day Not Reached so display blank cell
echo "<td width='40'> </td>\n";
}
}
}
echo "</tr>\n";
} else {
Code block to generate the first date row
We have to create different code to create the first row so that we can take into account which day of the week that the month started on.
First we output the HTML <tr> tag for the first row of the table.
We then have a for loop which will run 7 times, once for each column in the row. We then work through each cell, checking whether the current cell is equal to the position of the first day of the month. If it is, then we output 1 and increment $dayNumber by 1 so that it contains the next date.
If the position of the current cell does not equal the $currentCell value we can have one of two situations. The first is that we haven't reached the first day of the month position yet, in which case $dayNumber will still be 1, and we output a blank cell. If we have gone past the first day of the month position then we can simply output a cell containing the current day number.
We then output a closing HTML </tr> tag to close the first row.
Finally, we can output the rest of the rows in the table which we do with the rest of the code, repeated below:
} else {
# Create Remaining Rows
echo "<tr align='center'>\n";
for($currentCell = 0; $currentCell < 7; $currentCell++){
if($dayNumber > $daysInMonth){
# Days in month exceeded so display blank cell
echo "<td width='40'> </td>\n";
} else {
echo "<td width='40'>" . $dayNumber . "</td>\n";
$dayNumber++;
}
}
echo "</tr>\n";
}
}
Code to display the other date rows
This section of code is simpler. We just have to keep outputting the date until we have reached the figure indicating the number of days in the month, and then we just output blank cells until the table is completed.
As before, we first output an opening HTML <tr> tag. We then have a for loop which runs 7 times, once for each column in the row.
If we have exceeded the number of days in the month, which is stored in $daysInMonth then we output a blank cell. If the day number hasn't exceeded the number of days in the month then we output the day number, and then increment the day number by 1.
Finally, we close the row with an HTML </tr> tag to make sure the HTML is valid.
Formatting Tip
You may have noticed that throughout this tutorial many HTML tags have had the character "\n" at the end, as shown in the example code below.
echo "<td width='40'>Sun</td>\n";
echo "<td width='40'>Mon</td>\n";
echo "<td width='40'>Tue</td>\n";
echo "<td width='40'>Wed</td>\n";
echo "<td width='40'>Thu</td>\n";
echo "<td width='40'>Fri</td>\n";
echo "<td width='40'>Sat</td>\n";
When you use PHP to output HTML, if you view the source in a browser, the original formatting is lost (and we're only talking about viewing the source here rather than the actual web display). Without the new line character (\n) the output above would look like that below:
<td width='40'>Sun</td><td width='40'>Mon</td><td width='40'>Tue</td><td width='40'>Wed</td><td width='40'>Thu</td><td width='40'>Fri</td><td width='40'>Sat</td>
This makes it difficult to spot errors in the HTML generated whilst you're debugging. By appending the new line character to the end of the line, the formatting stays as intended in the browser's view source mode, and is much easier to debug, and also looks more professional.
<td width='40'>Sun</td>
<td width='40'>Mon</td>
<td width='40'>Tue</td>
<td width='40'>Wed</td>
<td width='40'>Thu</td>
<td width='40'>Fri</td>
<td width='40'>Sat</td>
The Calendar Output
When the code in Code Block 3 (full code) is run, you should see something similar to the screenshot below.
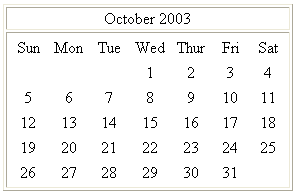
Figure 3 – Example output
In the example above you can see that the first day of the month is shown under the correct day, and that the month is shown with the correct number of days.
In the next part of this tutorial, we will look at styling the calendar using CSS, and making more advanced calendars that can interact with a database.

 Gareth has a range of skills, covering many computer and internet related subjects. He is proficient in many different languages including ASP and PHP, and is responsible for the setup and maintenance of both Windows and Linux servers on a daily basis.

