Table of Content:
- The Calendar
- Styling the Calendar
- Summary
In this article we will learn how to style an events calendar using CSS. We will walk through the steps of creating a calendar using an HTML table, complete with all tags and attributes to ensure that this table is accessible to users of alternate devices. Having created the calendar in the mark-up we will then move on to styling it in an attractive way using the CSS tools within Dreamweaver, in such a way that we do not add unnecessary mark-up to the page.
 The DMXzone Calendar extension enables you to add a great looking
calendar with many different styles and effects on your sites. Enrich
any form used for events, appointments or birthdays. Use it as a date
picker or inline calendar with its unique design and in flight
animation options. Embed multiple calendars, select date ranges, and
limit the selection to specific dates.
The DMXzone Calendar extension enables you to add a great looking
calendar with many different styles and effects on your sites. Enrich
any form used for events, appointments or birthdays. Use it as a date
picker or inline calendar with its unique design and in flight
animation options. Embed multiple calendars, select date ranges, and
limit the selection to specific dates.
![]()
![]()
![]()
Now that we have a calendar created with clean, structured mark-up we can begin to style it using CSS.
In the CSS Styles Panel in the Design Panel Group click 'New CSS Style' and in the dialog that opens create a class named 'caltable'. If this is an existing site and you already have a stylesheet then you can create these styles in your existing stylesheet file, otherwise select to define in '(New Stylesheet File)'.
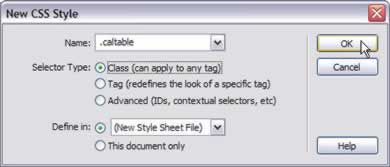
Create a class named .caltable
Click Ok and name and save your stylesheet if you are creating a new file. It will automatically be attached to your page.
The styles we are creating here will be applied to the table tag. Give the table a border by selecting the Border category and choosing a Solid, 1 pixel width border in #316395.
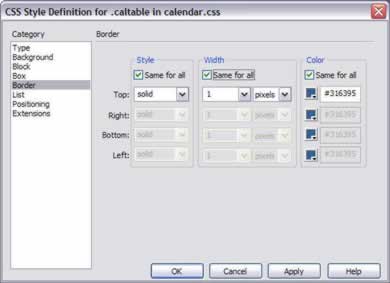
Adding a border to class .caltable
Click Ok to close this dialog and create the class. Select the table and apply class .caltable to it using the Properties Inspector.
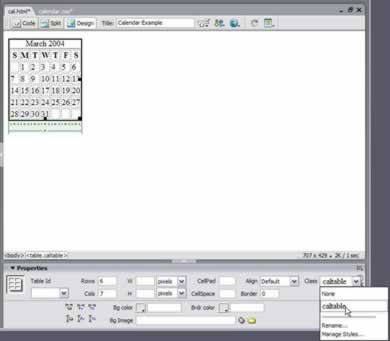
Applying the class to the table
We can now create styles for the cells that contain the days of the week, because we marked these up as table headings <th></th> this is as simple as creating CSS rules for the th tag within the table with the class .caltable.
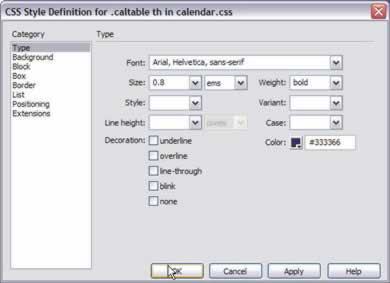
Create a New CSS Style. This time, under selector type choose 'Advanced (IDs, contextual selectors etc.)'. In the box at the top of the dialog (Selector) type .caltable th
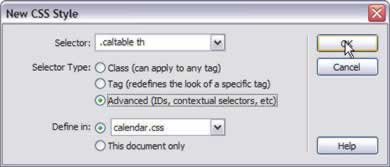
New CSS Style for .caltable th
You can now create styles for the th tag. These styles will only affect the th tag within our calendar table, so won't effect any other tables that you have marked up in your site. In the Type category I have set the font to 'Arial, Helvetica, sans-serif', 0.8 ems, bold, color #333366.
The 'Type' category
In the Border category, I am giving my th tags the same border as the table - solid, 1 pixel, ##316395.
In the Background category, I have given the th tag a background color of #C9C9E4. Click OK and your headings should immediately change to reflect these styles as the class .caltable is already applied to the table they are in. You don't need to add classes to each individual cell.
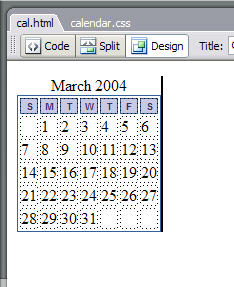
The Calendar after styling the headings
You can now repeat the process to style the table cells - td tags within the table with the class .caltable.
Create the New CSS Style in exactly the same way as you created the style for .caltable th except in the New CSS Style dialog create it for .caltable td.
In the Type category I have defined the font as 'Arial, Helvetica, sans-serif; 0.8 ems; color #333366'.
In the Border category I have create a solid, 1 pixel border with a color of #C9C9E4 - the same color as the background color of the heading cells. Click OK to see your changes in the calendar.

After styling the td tags
In Dreamweaver and if you preview in the browser you will see there are still gaps between the cells. To remove these gaps (if you want to) open your CSS file in Dreamweaver and find the section for .caltable:
.caltable {
border: 1px solid #316395;
}
Edit this section to add the line border-collapse: collapse;
.caltable {
border: 1px solid #316395;
border-collapse: collapse;
}
This change will not render in Dreamweaver, however if you now preview your calendar in a web browser you will see that there is no gap between the different cells of the table.
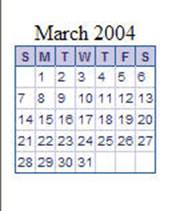
The calendar in a web browser
We can now style the month heading above the calendar, once again, we marked up this heading within the table by using a caption tag so to style it we simply need to create styles for caption within the class .caltable.
Create the New CSS Style as for .caltable th this time typing .caltable caption in the box.
Under the Type category, I give the caption a font of Arial, Helvetica, sans-serif; 0.9 ems; bold; color #ffffff.
Under the Background category I give it a Background color of #333366.
Under the Border category I give the table a 1 pixel solid border of #000000 (black).
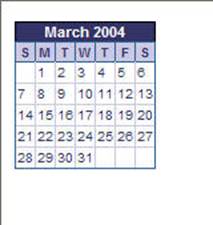
The calendar complete with caption in the browser
So far we have managed to style this whole calendar with only one addition to the mark-up - the class applied to the table itself. Often you will see that people have created styles for a table and applied them by adding a class to each td, you can usually avoid all of this extra mark-up by using selectors that only style tags within a container that has a class or id applied to it.
Where you might want to apply classes to cells in this table is where a cell contains a date that is a link. In blog applications calendars are sometimes used to link to the entry for that day and in that case, the linked entry would go to the blog for that day. Or, you might launch a pop-up window on click of a link detailing an event that is happening on that day or link to an informational page about the event. Highlighting the days that have a link makes it easy for the visitor to see which days to click on.
Create a New CSS Style, this time type .caltable .hilite into the box.
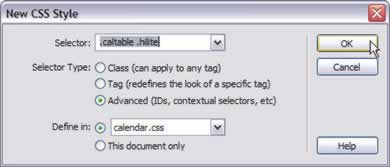
Create a class for .caltable .hilite
You can now specify the look that you want for highlighted cells. I have simply given then a background color of #D8D8EB and a border in the Border category of 1pixel solid #333366.
After clicking OK to create this class you will need to apply it to cells that have a link within them in order to create the highlighting effect. To apply the class, select the td you wish to highlight and apply the class using the Properties Inspector. Repeat this for each cell that you wish to highlight. If you were creating a dynamic calendar with a server side script you would need to write out this class on table cells that contained a link.
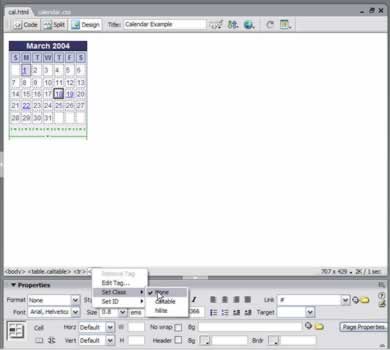
Setting the class hilite on the td tag
You can also style the links within these highlighted cells without adding an additional class to the a tag.
Create a New CSS Style for .caltable .hilite a:link
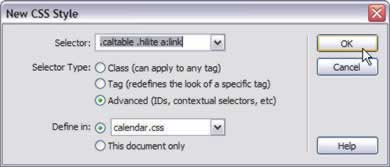
Creating a New CSS Style for .caltable .hilite a:link
You can then set styles for the links within these highlighted cells. I have simply made them a darker blue (#000033) and bold in the Type category.
You then need to repeat these styles for .caltable .hilite a:visited. You might want to use a slightly different style - perhaps a lighter color for visited links so that a user can easily see that they have visited that event or posting. If you wanted you could add a class for the hover state to create a highlighting effect onmouseover. Remember that you need to create the different states of the link in the following order: LINK, VISITED, HOVER, ACTIVE.
![]()
![]()
![]()
 Rachel Andrew is a trained dancer and singer, whose CV lists jobs as diverse as company choreographer for a physical theatre company to chargehand carpenter for “The Mousetrap” at St. Martin’s Theatre in London’s West End. After leaving the theatre when pregnant with her daughter, Rachel started to design sites mainly out of curiosity into how it worked. It didn’t take too long for her to figure out that her skills lay in development as opposed to design and these days she tends to leave the design to designers so she can concentrate on writing code, dismantling computers and installing Linux on anything that stays still long enough.
Rachel has worked in the industry as a webmaster, technical project manager and senior web developer but in September 2001 set up her own company ‘edgeofmyseat.com’, which provides complete web solutions and outsourced development services for design agencies and Internet start-ups who do not have in-house web developers.
As well as managing and doing much of the development on projects for edgofmyseat.com Rachel is a published author and worked as a co-author on the following titles for Glasshaus:
Dynamic Dreamweaver MX ISBN:1904151108
Fundmental Web Design and development Skills: ISBN:1904151175
Dreamweaver MX Design Projects: ISBN:1904151272
Rachel is also a member of the Web Standards Project serving on The Dreamweaver Task Force.
In her spare time Rachel studies for ‘fun’ with the Open University, does family and local history research and spends time with her 5 year old daughter and her other half, Drew McLellan.
You must me logged in to write a review.