But we’ll do a lot more than just talk. Beginning with Part 3, we’ll create a web site that utilizes the new features and show you the nuts and bolts of how to use this new beast. By the time we reach Part 15, you will be ready to throw out the old version forever. So grab your copy of Dreamweaver 8 (trial available at http://www.macromedia.com/downloads if you don’t own it yet) and get ready to be amazed.
Free! - Introducing Dreamweaver 8
This article is a sneak preview of the new Dreamweaver 8 e-book that will be released this month.
About the e-book
On 8/8/88, oops, 8/8/2005, Macromedia announced the coming of the next generation of their wonderful Studio and in particular, award winning HTML editor, Dreamweaver. No longer stuck in alphabet soup, this series of 15 articles will detail and teach you how to use the new features of Dreamweaver 8. There is a whole lot to talk about with this amazing new product and we will not only talk, but we’ll create a site utilizing the power of the program to its fullest extent. From the Unified CSS panel to the integration of XML to the quick and easy Code Collapse, Dreamweaver 8 is chock full of goodies to make the designer’s life a whole lot easier and web sites a whole lot quicker to create.
![]()
![]()
![]()
![]()
![]()
Feature #3: Guides
Also new to the visual scene is the addition of Guides. If you cruise down the View menu, you will notice the option and there is a substantial submenu for Creating, Locking, Editing and of course, Clearing Guides. There is also a menu with common page sizes which plop vertical and horizontal guides where the right and bottom edge of these page sizes occur. These unassuming green lines aid tremendously in laying out web pages where specific size matters.
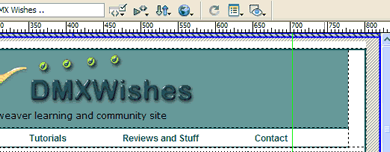
The addition of guides make it easy to line up your layout and specify the CSS to make it work the way you want it to. You can quickly move them anywhere you want them to be or specify them to be a certain width and height in the View Guides menu.
Feature #4: Print Code
Another small and easily missed addition, but one that I have used more than any other, is the addition to the Standard Toolbar of a Print Code button. No longer does the user have to flip to Code View and select and copy the code to paste into Notepad to get a printout for debugging purposes. Just press the Print Code button and the code prints for you. It couldn't be any easier! You don't even have to change to Code View to make it work. Simply select the Print Code button located on the Standard Toolbar right from Design View and the code will still print, complete with numbered lines.

The print code button works from either Design or Code view
Feature #5: Rendering with Style
New to Dreamweaver 8 is the Style Rendering toolbar. Recognizing that Dreamweaver developers work in applications that involve deployment on more than just a web page, Macromedia got busy and created the Style Rendering toolbar. One quick toggle renders the style sheet you have assigned for screen. Click again and the style sheet for print is rendered. There are also choices for several other devices as listed in the caption below.
From left to right, Screen Media, Print Media, Handheld Media, Projection Media, Teletype Media, Television Media and Toggle CSS Style Rendering On and Off. Please note that no changes will be noticed if no style sheet has been created for a specific media type.
Feature #6: ZOOOOM!
Native to most graphics programs like Fireworks is the ability to zoom in and out on an object to get a better view of tight places and pixels. That has never been a possibility with an HTML editor however... until now. New to Dreamweaver 8 is the Zoom Tool. I tried this thing when I first saw it and it worked great and I thought... "Okay ... big deal ... why would I want to zoom in and out of code anyway? It makes it pixelate and you can't read it". I changed my mind this afternoon.
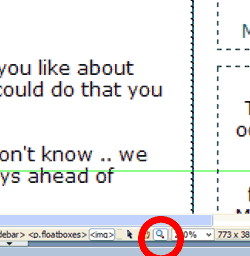
The Zoom Toll immediately allows you to enlarge your view of any page
I was working on a CSS layout for a new client and I could see a sort of half yellow thin border that looked like it was just off the side of my div into the margin. I couldn't see it well, however, and really had no clue as to why it would be there. I remembered the Zoom Tool and put it into action. Blowing the picture up to 400% helped me to immediately identify where the yellow was coming from and what to do about it. Without this handy little tool, I could have spent hours and ruined my eyesight in the bargain. Loud applause for the new Dreamweaver 8 Zoom Tool, located at the bottom of the document window.
![]()
![]()
![]()
![]()
![]()
Nancy Gill
 In early 1996, Nancy Gill picked up her first book on HTML and permanently said goodbye to the legal field. She has been busy ever since developing web sites for businesses, organizations and social groups in Central California and occasionally beyond. Nancy has served as a member of Team Macromedia since late 2001, first with UltraDev and then moving to Dreamweaver when the programs were consolidated in 2002. She also serves as Assistant Manager for the Central California Macromedia User's Group.
Nancy is the co-author of Dreamweaver MX: Instant Trouble-Shooter and technical editor for several Dreamweaver and Contribute related books, including the well-known Dreamweaver MX 2004: A Complete Reference. She also penned the first ever Contribute article for Macromedia's Own Devnet "Getting Up to Speed with Contribute in 10 Minutes".
Nancy has three children, two in college and one in high school. Offline, she enjoys various sporting activities, is a wild NFL football fan and sings in the church choir.