
This article explains the Application Panel in Dreamweaver MX.
It is part from the book Dynamic Dreamweaver MX written by many famous people including our own Omar Elbaga from the UDzone team!
This article explains the Application Panel in Dreamweaver MX.
It is part from the book Dynamic Dreamweaver MX written by many famous people including our own Omar Elbaga from the UDzone team!
![]()
![]()
![]()
![]()
![]()
![]()
![]()
![]()
![]()
![]()
![]()
![]()
The Delete Record Behavior works very similar to the Update Record except that it deletes the record from the database. Just like the Update Record, you have to retrieve the record you want to delete and then add the server behavior. Open your books.asp page, and right next the "edit" hyperlink, add a "delete" hyperlink that links to a page called delete_book.asp (which we will create in a minute) and pass the book_id as a URL Parameter, as we've done before. Name the URL Parameter book_id.
Create a new dynamic ASP web page and save it as delete_book.asp. Create a new recordset and name it rsGetBookForDelete. Make sure the conn_webprodmx connection is selected, and add the following SQL:
SELECT book_id, book_title, book_author_fname, book_author_lname
FROM books
WHERE book_id = MMColParam
Add a variable directly below named MMColParam, with a Default Value of 0, and a Run-time Value of Request.QueryString("book_id"). Hit OK.
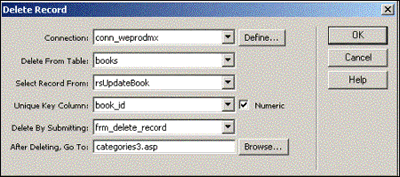
Drag and drop the book_id, book_title, book_author_fname, and book_author_lname onto your document as you wish. You might also want to add a message like, "Are you sure you want to delete this book?" for example. Below this text, insert an empty form and insert a button inside the form. Change the button's label to "Delete Book". Name the form "frm_delete_book". Add the Delete Record behavior by selecting Server Behaviors > + > Delete Record. Make sure the conn_webprodmx connection is selected, set Delete From Table as books, and Select Record From the rsGetBookForDelete recordset. Select the book_id as the Unique Key Column, Delete By Submitting the frm_delete_book form, and redirect to categories3.asp after deleting. Your Delete Record dialog box should now look like this:
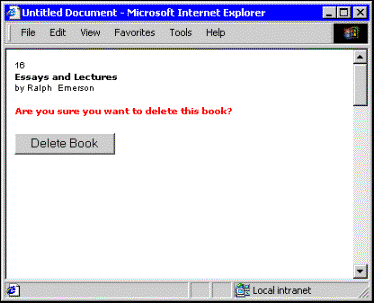
Hit OK - we are now finished! Test your delete function live - it should look something like this:
We now have completed a pretty thorough web application that allows us to view and update a book database via the Web. We have the ability to insert categories or books, and update and delete books. We can even move books into different categories.
One way to extend our application would be to add a facility for user logins - this leads us to the next group of server behaviors.
The User Authentication group of server behaviors contains four server behaviors that make creating a login extremely easy. Once we have a login set up, we will be able to restrict access to pages or even parts of pages. Let's create a login and play with these behaviors.
This server behavior generates the entire code that will open a table, verify a user, and redirect him or her to a desired page. All we have to do is create the login form. The Log In User behavior also does something else - it creates one session by default and another optionally. The session created by default holds the username of the person logging in - it is called MM_Username.
You can also optionally make Dreamweaver MX set a session for the column that holds access levels. The session will be called MM_UserAuthorization.
Both of these sessions can be accessed later on with this code: Session("MM_Username") and Session("MM_UserAuthorization"). Before we begin, let's take a look at the database table that will store the users:
| user_id |
Autonumber (primary key) |
| username |
Text |
| user_pwd |
Text |
| first_name |
Text |
| last_name |
Text |
| |
Text |
| access_group |
Text |
| dtstamp |
Date/Time |
Login In User will authenticate the user by checking to see if the values submitted in the login form match the username and user_pwd columns. I have filled the user table with some values. You can add your own directly to the database, or create an Insert Record behavior (as we saw earlier in the chapter) to allow insertion of new login records from the Web.
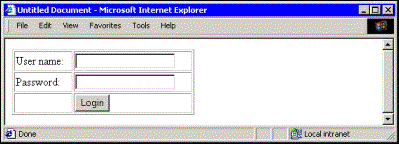
Create a new dynamic ASP web page and save it as login.asp. Create a login form by inserting an empty form in the document - rename the form "frm_login", and insert a table with 3 rows and 2 columns inside the form. Type the text "username:" in the left column of the first row and "password:" in the left column of the second row. Insert textfields in the top and second rows of the right hand column. Name the username textfield "username", and the password textfield "user_pwd", as these are the names of the corresponding database columns. Select the password textfield and, from Properties, change the Type to Password. This will make sure that asterisks replace characters typed when the page is accessed live. This is important so that the password is always hidden even while logging in. Insert a button in the bottom row of the right-hand column - change the label of the button to "Login". The form should now look like this:
Add the Log In User behavior by selecting Server Behaviors > + > User Authentication > Log In User. Fill in the resulting dialog box so it looks exactly as shown here:
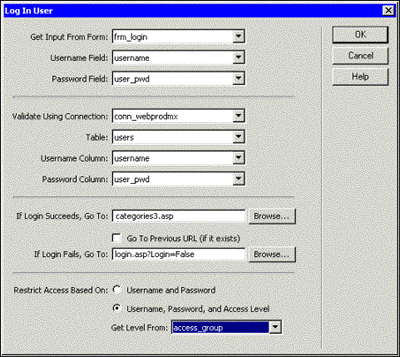
As you can see, we have selected access_group as the column to Get Level From - this will make the behavior create the optional session we talked about earlier, MM_UserAuthorization. It will hold the value of the access_group column for the successful user into a session (you can simply restrict access based solely on username and password, but for this example we will restrict based on Access Levels too). Hit OK.
Our Login application is complete, but before we test it in a browser, open the categories3.asp page. Select Bindings > Session Variable and type in MM_Username and click OK. You will now see the Session available under Bindings. This does nothing but make it easier for us to add the code Session("MM_Username") to our pages, to identify the user currently in session.
Somewhere at the top of this page type the text, "Welcome username!" Highlight the username text and select the MM_Username session from Bindings and click Insert (at the bottom of the Application Panel).
The username text should be replaced with the code <%=Session("MM_Username")%>. You can now test your login in a browser - load the login.asp page, type in "omar" for the username and "123456" as the password. You should be taken to the categories3.asp page.
![]()
![]()
![]()
![]()
![]()
![]()
![]()
![]()
![]()
![]()
![]()
![]()
 George Petrov is a renowned software writer and developer whose extensive skills brought numerous extensions, articles and knowledge to the DMXzone- the online community for professional Adobe Dreamweaver users. The most popular for its over high-quality Dreamweaver extensions and templates.
George is also the founder of Wappler.io - the most Advanced Web & App Builder
Comments
Hello to everybody
textsing
RE: Hello to everybody
You must me logged in to write a comment.