
This article explains the Application Panel in Dreamweaver MX.
It is part from the book Dynamic Dreamweaver MX written by many famous people including our own Omar Elbaga from the UDzone team!
This article explains the Application Panel in Dreamweaver MX.
It is part from the book Dynamic Dreamweaver MX written by many famous people including our own Omar Elbaga from the UDzone team!
![]()
![]()
![]()
![]()
![]()
![]()
![]()
![]()
![]()
![]()
![]()
![]()
Before you can utilize your database within your ASP web applications, you need to create a connection from the ASP page to your database. Fortunately Dreamweaver MX makes it simple for you. There are two ways you can create a connection to your database: Data Source Name (DSN) or Custom Connection String (often referred to as a "DSN-less connection").
Before you can create connections you must make sure the PC that hosts the database and serves the connection has the appropriate data access drivers (Microsoft Data Access Components - MDAC) installed - look for driver details in the following places:
· Windows 95, 98, or NT - go to Start > Settings > Control Panel > ODBC Data Sources (32-bit)
· Windows 2000 - go to Start > Settings > Control Panel > Administrative Tools > Data Sources (ODBC), then click the Drivers tab
· Windows XP - go to Start > Control Panel > Performance and Maintenance > Administrative Tools > Data Sources (ODBC), then click the Drivers tab
If you see the ODBC icons then the appropriate drivers should already be installed. These drivers are usually installed as standard, but if you find yourself without the right drivers you can download the latest ones from http://www.microsoft.com/data/download.htm.
The connection string is simply a string containing variables that contain information to connect to the database such as the provider type, physical location of the database on the server, and username and passwords if any. You will choose between two provider types, an ODBC (Open Database Connectivity) or an OLE DB provider. OLE DB is simply built on the success of ODBC by providing access to more kinds of data. The providers allow you to make a connection between your application and your database by specifying the database driver and database location. The string must then be embedded in every page that will retrieve database records. When you give Dreamweaver MX the string you want to use, it creates a separate folder called Connections with a file named after your connection. Whenever you create a recordset, Dreamweaver MX by default includes the string at the top of your page. (You will learn about Recordsets in the next section.) Hence you will not have to worry about it adding the connection string to each page.
The connection string syntax will vary depending on the provider and database you use. Since Access and SQL Server are the two database types most often used with ASP, we will show the syntax for both of them for both the ODBC and OLE DB providers:
Microsoft Access
Driver={Microsoft Access Driver (*.mdb)};Dbq=C:\folder_name\dbname.mdb;Uid=username;Pwd=passcode;
SQL Server
Driver={SQL Server};Server=server_name;Database=dbname;Uid=username;Pwd=passcode;
Microsoft Access
Provider=Microsoft.Jet.OLEDB.4.0;Data Source=c:\folder_name\dbname.mdb;User Id=username;Password=passcode;
SQL Server
Provider=SQLOLEDB;Data Source=machine_name;Initial Catalog=dbname;User ID=username;Password=passcode;
The strings should be written in one line. If you are not protecting your database with a username and password you can leave that part out of the ODBC string: Uid=username;Pwd=passcode; or the following out of the OLE DB string: User ID=username;Password=passcode;.
As you may know you can set a password for an Access database through Access tools. For ODBC connection strings, if you set a password on an Access database you can leave this part out of the string: Uid=username; and simply fill in the password. Here is an example:
Driver={Microsoft Access Driver (*.mdb)};Dbq=C:\folder_name\dbname.mdb;Pwd=123456;
For OLE DB connection strings, if you set a password on an Access database you need to manipulate the string a bit. You should replace the following part: User ID=username;Password=passcode; with: Jet OLEDB:Database Password=12345. Here is an example:
Provider=Microsoft.Jet.OLEDB.4.0;Data Source=c:\folder_name\dbname.mdb;Jet OLEDB:Database Password=123456;
Many web developers have performed tests to compare between the providers and it turns out that the OLE DB provider is recommended as being a faster connection than ODBC.
For more connection strings, go to http://www.basic-ultradev.com/articles/ADOConnections.
Your database should be located above the wwwroot, because if it resides underneath the wwwroot folder, it will be available to viewers of your web site. Anyone who knows the name of the database can attempt to download it! If it resides above the wwwroot directory, you can retrieve the physical path to the database by using the code Server.MapPath. You should know the name of your database and the folder it resides in. You can create a file containing a line of ASP similar to the one below within the wwwroot of your site to display the physical path to the database:
<!-- display_dbpath.asp -->
<%=Server.Mappath("folder_with_database\webprodmx_data.mdb") %>
Before we add a connection we must open a page. Create a new dynamic ASP web page and save it as categories.asp in your webprodmx_files directory. The file will now be associated with your webprodmx site (save all future files under this directory and site). You can create a connection to a database using a custom connection string by writing the appropriate string in the field of the custom connection string dialog box - click the plus sign (+) under the Databases tab from the Application Panel. Click the Custom Connection String option, as seen overleaf:
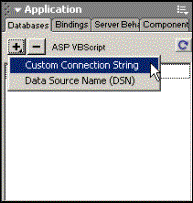
You should then see the following dialog box:

Here you must enter a name for your connection and the custom connection string in the appropriate fields. Name your connection conn_webprodmx, and enter the appropriate string (see above), making sure that you adjust the database location and ID and password as needed.
As a convention, the prefix Conn is often attached to the beginning of the connection name such as: conn_webprodmx, ConnWebProDmx, etc.
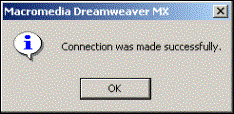
At this point you should test your connection, by hitting the Test button. If it is successful you will see the following alert box:
Now hit OK, and OK the Custom Connection String box. If everything was successful you should see your connection added in the panel space under the Databases tab.
![]()
![]()
![]()
![]()
![]()
![]()
![]()
![]()
![]()
![]()
![]()
![]()
 George Petrov is a renowned software writer and developer whose extensive skills brought numerous extensions, articles and knowledge to the DMXzone- the online community for professional Adobe Dreamweaver users. The most popular for its over high-quality Dreamweaver extensions and templates.
George is also the founder of Wappler.io - the most Advanced Web & App Builder
Comments
Hello to everybody
textsing
RE: Hello to everybody
You must me logged in to write a comment.