Explore the Premium Content

Photoshop CS2: How to Recognize Deceptive Photographs

Photoshop CS2: The Bad and the Ugly

Photographers, graphic designers, and artists now have access to one of the most powerful tools that Adobe’s offered through their Photoshop CS2 software. Digital artists can alter landscapes, touch up faces, and create fantasy images that boggle the mind. Altered images, however, have pervaded the news media through deceptive photojournalism. In this article, Linda offers some infamous and not-so-famous photographic alterations that have been detected over the past century. Accordingly, she’ll lead you through the methods that were used to create these images.

Read More

Photoshop CS2: Beyond Colour – Black and White and Sepia

What if you need a Black and White image to enter into a contest? Or, what if you shot a historic photo and the newspaper only prints black and white? In this article, Linda shows how to successfully convert your colour images into monochromatic legends. The tools that you’ll use include adjustments, histograms, Colour channels, Channel Mixer, and Calculations. In addition, once you have that perfect black and white image, Linda shows two different methods to add a sepia tone to that image.

Some History

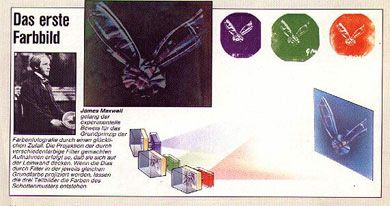
It wasn’t until 1861 when Scottish physicist James Clerk-Maxwell demonstrated a colour photography system involving three black and white (B&W) photographs, each taken through a red, green, or blue filter. His first photo of a tartan ribbon was turned into lantern slides and projected in registration with the same colour filters. This was the beginning of the photographic colour separation method.

In 1906, panchromatic black and white film and therefore high quality colour separation colour photography were made available; and, in 1907, the first commercial colour film, the Autochrome plates, were manufactured by the Lumiere brothers in France. But, colour photography really didn’t catch on with the general public until 1936, when the development of Kodachrome, the first colour multi-layered colour film and the development of Exakta, pioneering 35mm single-lens reflex (SLR) camera were made available.

In fact, colour photography evolved rapidly during my lifetime. I remember when C-41 colour negative process was introduced in 1973, replacing C-22 in the darkroom. My fellow art students and I were mesmerized with the new process, a feeling that you might equate today with the introduction of any new technological product that makes life just a little bit easier.

But, as beginning photography students, we often were steered away from colour in our studies. B&W images, instead, became the vehicle to study depth of field and tonal values, and it was – in the long run – less expensive to develop in the darkroom. In addition, most magazines used B&W photographs until just ten years before this new colour development. Yes, hand-colouring negatives and prints was part of our education at that time.

Read More

Photoshop CS2: Creating Spot Colour Channels

Photoshop CS2: Creating Spot Colour Channels

In this article, Linda creates a graphic design problem to show how to create artwork for iron-on transfers, including a means to create a spot colour and how to save that colour in a spot colour channel. She also uses a rough logo and artwork that must merged, and shows how to convert those two images into one in ten easy steps, including how to layout that artwork for the transfer sheet. Tools used in this process include scaling and layout options covered in previous articles, the Unsharp Filter, the Warp tool, Create Outlines filter, and the use of Pantone Colour swatches, among many others.

Read More

Photoshop CS2: Extraction, Smudge, Heal, and More

Photoshop CS2: Extraction, Smudge, Heal, and More

Although Photoshop CS2 offers a few perks more than Photoshop 7, some of the same tools to retouch photos are unchanged. The Extraction tool, which helps to eliminate a background, is found as early as Photoshop 6. Healing, Patch, Smudge and Blur tools are also found in earlier Photoshop versions. In this tutorial, Linda illustrates when and how to use all these tools and more as a means to either retouch or to alter photographs.

Read More

Photoshop CS2: Altering Images

Photoshop CS2: Retouching in Channels

In the last tutorial, Linda explained how you could alter your images with levels and curves through adjustment layers. In this article, she shows how you can retouch your colour images through colour channels. This option allows users to change values, tones, and colour through channel modifications. An added bonus is that artefacts, or blemishes, can be reduced through the colour channel option as well. And, when that option doesn’t work, you can use colour channels to pick the best option for a black and white photo…

Colour Channels: The Hidden Realm

Many photographs might call for simple adjustments to the overall picture, such as a simple tonal and value alteration in photograph below:

The image at left was a little too dark in the shadows and the owner wanted to emphasize the filly a bit more. I brought up the mid-tones and reduce the shadows with the simple addition of a new adjustment layer for levels. Now the horse is more vivid and the details are more solid in the horse (more about adjustment layers and levels in the previous article).

But, other photographs – like the 1960’s era photograph below – call for more detailed work, and a simple adjustment layer just doesn’t cut the cake. The image below, for example, was altered with the same method that I used above with the following results:

Read More

Photoshop CS2: Jewel Case Cover Art

In this article, Linda illustrates how to merge images and type to create a jewel case insert for an imaginary client. In a step-by-step process she includes information about how to create paths with the pen tool, how to use these paths for text, and shows how to create a burned edge effect around an image by creating, saving and loading a selected area. Along the way she includes tips on how to make your workflow proceed faster as you begin to create this project or other projects that include type and images.

Read More

Photoshop CS2: Build a Fantasy Landscape, Part II of II

Photoshop CS2: Finalizing the Fantasy Landscape

In the previous Photoshop CS2 article, Linda began to demonstrate how to build a fantasy landscape from several seemingly disparate objects. In this article, she wraps up that landscape with demonstrations in how to use several filters and blending modes to achieve the final result, a layout based upon the Rule of Thirds. Some of the other tools that you’ll use in this tutorial include the “Highlight/Shadow” adjustment and healing tools, Colour Channels, and the Lens Correction Filter.

Read More

Photoshop CS2: Build a Fantasy Landscape, Part I of II

In the previous Photoshop CS2 articles, Linda illustrated how to use a variety of selection tools to select portions of images to remove them, to move them, or to alter them with filters. In this first of a two-part series, Linda begins to build a fantasy landscape with images extracted from several photographs. She then alters the resultant layers with filters and blending modes. Not only will you learn about some Photoshop CS2 tricks, but you’ll use some composition guidelines to build this fantasy land. The photographs with the images already extracted are included at the end of this article so that you can play along.

Read More

Correcting lens and perspective distortion

When you photograph buildings, or any scene with strong vertical lines, your image will show, to varying degrees, distortions due to the lens and arising from the angle of view.  When you print the photograph these distortions are immediately obvious and can ruin an otherwise good print.  They can also make building a panorama from several distorted photographs very difficult, even if the distortions are slight.

There are specialist cameras and lenses you can use to avoid these problems, but unless you're a professional photographer, these are probably outside your budget.  Fortunately with digital image processing, we can correct most or all of these distortions.  There are quite a number of ways to do this, and for different image editing software applications there are different approaches.

This article shows how to do this using Photoshop CS2, PaintShop Pro 8, Fireworks (4, MX, MX2004, 8) and earlier versions of Photoshop and PSP using plugins from theimagingfactory.com.

Read More

Creating Buttons and Tabbed Interfaces in Photoshop

The State of the Button

Hyperlinks are the glue that holds the web together. Without an easy way to navigate from page to page, we would never find all the useful information on the internet. Of course, blue underlined hyperlinks don’t give your site much flexibility. That’s where buttons come in. Buttons have been around on the web for about as long as Mosaic brought graphical browsing to the masses back in the early ‘90s. The styles and colors have changed over the years; from simple flat color buttons to colorful glossy buttons, we’ve seen it all. There now seems to be a fairly even split between approaches to buttons in web interfaces. On one side are the minimalist buttons that just give a hint that they’re clickable, often with no graphics in sight. At the other end are buttons that take their job seriously and use various graphical tricks to make their ‘clickability’ obvious.

Advertisement Fish Eye Menu

Do you want to create fantastic interactive menus with a Mac OS X toolbar look? Use FishEye menu for your website buttons. Make galleries, portfolio's, menu's or anything else where you need a cool navigation. All without Flash, pure JavaScript and CSS. Use effects that will make your eyes pop out! Choose from one of the many predefined styles or create your own, there will always be a menu that suits your needs!


This article discusses the most prominent styles and how you can create them in Photoshop and Dreamweaver. Along the way, I’ll give you numerous examples and additional resources. Let’s get started…

Read More

What colour to paint the house?

You've probably seen those video consoles in home improvement stores or paint suppliers which allow you to apply different paint colours to a house photograph, to see how the colours go together and what the house will look like when painted.  They work OK, but there's one big problem.  The house they use in the example looks nothing like the one you want to paint.

This exercise shows you how to use Photoshop layer masks and a photograph of your own house to get the same effect.  And who knows, the paint shop proprietor might even pay you to do it as a service to clients!

We'll start off with a bit of photographic tweaking and then use a variety of selection tools to select areas and convert them to adjustment layers.  Then you can change to colours of your house (within limits) to your heart's content (and so minimise wasted paint!).

Read More

Photoshop Tips & Tricks for Web Designers

There are hundreds of tools and features in Photoshop. Learning the basics requires an investment of time and mental energy. Moving beyond the basics into true mastery requires even more time and an adventurous spirit. Of course, it helps to pull on the countless years of accumulated experience that millions of Photoshop users have amassed. That’s what this article is all about: distilling the useful tidbits learned by years of poking, prodding and just having fun experimenting with this great tool.

Most of the tips presented will work in Photoshop 7, CS (8) or CS2 (9), but in some cases there are techniques that only work if you have certain tools and features. The screen captures were taken in Photoshop 7 and CS2.

Read More
Newer articles Older articles