Premium Content


Premium Content articles are the very best articles from the world's leading internet technology, subject-matter experts. We have many categories of content below on a wide variety of subjects that have all been commissioned from big name authors.

Explore the Premium Content

Creating a MyLinks manager with Flash MX 2004 UI components

A component is basically a movie clip that can be reused in your Flash projects.  You can drag a component onto the Stage and quickly change its settings to create applications in Flash.  You can configure the way components work either through the Component Inspector panel or by writing ActionScript.  Flash MX 2004 ships with a number of standard User Interface (UI) components that you can use to build simple forms-based elements.  You can also buy components from third party developers or create your own.

Components were first introduced in Flash MX but they changed with the introduction of ActionScript version 2 in Flash MX 2004.  Consequently, you can't use Flash MX 2004 components with ActionScript 1.  You can find out more about which components to use with which version of the Flash Player over here.

The professional edition of Flash MX 2004 includes extra UI components such as the Accordion, DataGrid and Tree as well as a set of Data components, used specifically for working with dynamic data.

In this tutorial, we'll create a MyLinks Manager application with some of t he UI components that come with Flash MX 2004.  The application will store a list of favourite Web site links and a comment about each one. We'll be able to add and delete links as well as pop up a link in a new browser window. The information will be saved in a SharedObject so that it can be reused.

You'll learn how to add components to the Stage and customise them with the Component Inspector. You'll also learn how to set component properties within ActionScript and how to assign eventListeners to buttons. Finally, you'll learn about SharedObjects and use one to store information.

The tutorial assumes that you are using Flash MX 2004 Professional and that know how to add ActionScript to a movie.

You can download the source files for the tutorial from the blue Properties box that contains the article PDF. There's a heading titled Code Download and you can click the Details link next to it to get the zip file. The download includes the starter file myLinks.fla as well as the completed file myLinks_completed.fla.

Note: If you have difficulties downloading the source files or PDF, you might have a problem with your cookies. Delete the cookies from your machine and try again. In Internet Explorer, you can do this by choosing Tools > Internet Options... and clicking the Delete Cookies... button on the General tab.
Read More

Building Your Own RSS Feed with Dreamweaver

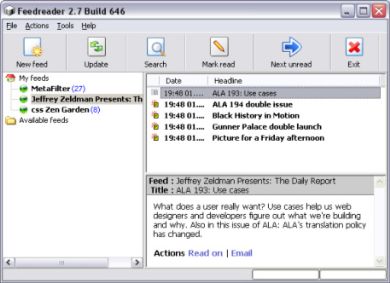
RSS is a method of syndicating your content to other web sites and users. It provides a summary of your content in a compact XML-based form. If you read Weblogs, you've probably encountered them, as most blog generate them so that friends can share their recent posts easily across different systems. If you're using Mozilla, you can bookmark RSS feeds to easily keep up with the latest headlines from your favourite websites. Other sites with a similar interest can use RSS to show your headlines and send you interested traffic. Alternatively you can use a program called an RSS Aggregator (like the one at http://www.feedreader.com/) to keep track of all your favourite headlines:


In this tutorial we'll look at how to create an RSS feed in Dreamweaver MX 2004, using the PHP Server Model. It assumes a basic familiarity with the PHP Server Model, since it doesn't include the basics of setting up the site or database.

Read More

Building a Flash MP3 Player part 2

In part 1 of this tutorial series, we used Flash MX 2004 to build an MP3 Player. The player used functions to load a list of MP3s from an XML file into Flash. It allowed us to play, stop and rewind the songs as well as increasing and decreasing the volume.

In Part 2 of the tutorial, we'll build the same MP3 Player using AS2.0 classes. It'll be useful if you're looking to extend your skills in this area. If you haven't completed part 1, it might be a good idea to do so before starting this tutorial.

The tutorial assumes that you are working with Flash MX 2004 Professional and that you know how to write ActionScript. You'll learn how to create custom classes in Flash and use them to load the MP3 player with songs from an XML file.

You can download the source files for the tutorial from the blue Properties box that contains the article PDF. There's a heading titled Code Download and you can click the Details link next to it to get the zip file. The download includes the starter file MP3s001.fla as well as the completed file MP3s001_completed.fla and the finished class files.  You'll need to supply your own MP3 files.

Note: If you have difficulties downloading the source files or PDF, you might have a problem with your cookies. Delete the cookies from your machine and try again. In Internet Explorer, you can do this by choosing Tools > Internet Options... and clicking the Delete Cookies... button on the General tab.

Read More

Cultural Perspectives: The Colour Wheel Goes to the Bahamas

Is the Colour Wheel International?

I often wonder if “colour wheel mentality” is limited to western tradition, or if colour schemes – like McDonalds – have become global and, if so, do they now override cultural traditions in other countries? This week, I’ll share what I learned about certain Caribbean traditions. When we analyze Bahamian colours and symbols, we can deepen our understanding of cultural differences. When we comprehend how and why these colours and symbols are used, we can incorporate this information into our own work when appropriate.

A Geographic Perspective on Colour


Junior Junkanoo Girls in Nassau (photograph by author)

I’m an enthusiastic cheerleader for traditional colour schemes that evolve from the colour wheel, because these schemes work to elicit fairly predictable responses from viewers. But, do these schemes work worldwide? If not, where can we find examples of artistic difference that would help us compare a western artistic heritage against another point of view?

The opportunity to learn answers to the above questions became available to me in December 2004, when I participated in a three-week history/anthropology/archaeology course in New Providence and San Salvador islands in the Bahamas. During this trip, I experienced the Junkanoo, a tradition that incorporates a seeming rainbow of colours in its presentation. Before we look at Junkanoo, however, a little information about Bahamian culture will help us understand how these people use colour and why this usage differs from some western concepts.

Read More

ColdFusion MX: Reusing Code

In the last two articles (ColdFusion MX Installation & Basic Testing and ColdFusion MX: Displaying Database Data) we did a lot of setup for our working environment, and we were able to retrieve records from a MySQL database to display on the screen.  At this point when you’re ready to start writing more code, it’s a good time to learn about code re-use in ColdFusion MX.

The basic mantra of all developers is “write it once, use it many times”.  There are many reasons why we try to reuse the code we write such as lower maintenance, site/application consistent look and feel and even a layer of abstraction where we can separate our business logic of our application from the user interface.

ColdFusion MX gives us several devices for reusing code.  In this article, I’d like to touch on all of the code reuse tools that are available to us.

In this article, we’re going to work with ColdFusion MX and explore the following tasks:

·         The <cfinclude> tag

·         ColdFusion Mappings

·         Custom Tags

·         User-Defined Functions

·         ColdFusion Components (CFCs)

·         Code reuse best practices

These are the basic tools available to us for code reuse in ColdFusion MX.  Often times, we use these tools to help us with our application architecture.   Much can be written on any one of these topics and here I’d like to give good introductory examples on each so you can begin using them right away in your applications.

Read More

Building a Flash MP3 Player part 1

Flash comes with some great features for working with sound. One useful aspect allows you to dynamically load MP3 files into a Flash movie. Flash can stop and start the song as well as controlling the volume.

In this tutorial, we'll use Flash MX 2004 to build an MP3 Player. The player will show a list of MP3s and allow you to play, stop and rewind the songs. We'll also add a volume controller. Most MP3 players require you to load the mp3 files into Flash but in this tutorial, we'll store the songs in folders and use an XML file to tell Flash where everything is located.

Advertisement

This cool Dreamweaver extension lets your users enjoy a great MP3 player on your website  within a few clicks and with no Flash knowledge at all! Just select your favourite songs and a fancy skin and the extension creates a Flash MP3 Player for your website. The song title is displayed together with all the necessary controls in a cool fully stylable interface.

Get it now read more


In Part 2 of the tutorial, we'll build the same MP3 Player using AS2.0 classes. The second tutorial is aimed at anyone who is looking to extend their skills in the area.

This tutorial assumes that you are working with Flash MX 2004 Professional and that know how to write ActionScript. You'll learn how to work with the Sound class in Flash and load MP3s into Flash. You'll also learn how to extract values from a simple XML file and add them to UI components. We won't go into a lot of detail about XML as that's been covered in an earlier tutorial – Creating a Photo Gallery with Flash and XML - part 1.

You can download the completed files for this tutorial from the blue Properties box that contains the article PDF. There's a heading titled Code Download and you can click the Details link next to it to get the zip file. You'll need to supply your own MP3 files.

Note: If you have difficulties downloading the source files or PDF, you might have a problem with your cookies. Delete the cookies from your machine and try again. In Internet Explorer, you can do this by choosing Tools > Internet Options... and clicking the Delete Cookies... button on the General tab.

Read More

Customising Dreamweaver Menus

One of the joys of Dreamweaver MX 2004 is its flexibility. With a little extra knowledge you can customise it so that it fits your particular workflow. You can hide the panels you don't like, record commands to speed up your common tasks and  customise the menus.

In this tutorial we'll be looking at  how you can alter the structure of the main Dreamweaver menus, allowing quicker access to the features you use, and moving those you don't to somewhere un-obtrusive.

Read More

Creating a Flash Date Picker for HTML pages

Working with date fields is one of the biggest frustrations for Web developers. You have to make sure that users enter a date in the correct format. For example, in Australia, we put the days first whereas in America the month is entered first. You also have to check dates for invalid entries e.g.  31st February. 

If your date field is in Flash, MX 2004 Professional includes a DateField component to help with this problem. The component is made up of a text field with a calendar icon on the right hand side. You can't enter text into the text field. Instead, you have to click the icon to bring up a date chooser.  After you have selected a date, the date chooser closes and the value is transferred to the text field. Providing you've set up the component correctly, it's impossible for the user to enter an incorrect value.

But how can you solve this problem if you're working in an HTML page? You can still use Flash to enter dates in your Web forms. In this tutorial, we'll use the DateChooser component that comes with Flash MX 2004 Professional. We'll add an icon to a Web form that pops up a Flash movie containing the DateChooser. Then we'll use some JavaScript to send the value back to the Web form. Once you've developed this movie, you can add the functionality anywhere in your Web projects with a few lines of JavaScript.

This tutorial assumes that you are working with Flash MX 2004 Professional and that know how to work with ActionScript. In this tutorial, you'll learn how to send variables into Flash with FlashVars. You'll also learn how to call a JavaScript function from within Flash as well as how to use JavaScript to add a value to a Web form.

You can download the source files for the tutorial from the blue Properties box that contains the article PDF. There's a heading titled Code Download and you can click the Details link next to it to get the zip file. The download includes the completed files datePicker_completed.fla, form.htm and datePicker.htm.

Read More

ColdFusion MX: Displaying Database Data

In my previous article we set up our ColdFusion MX environment, learned some basics on ColdFusion and created a sample page using some simple tags and functions.  The page itself was a fancy “hello world” example with few lines of code. 

The truly great thing I love about ColdFusion is that you can do really great things with few lines of code.  One of the things that impressed me most was how easy it was to retrieve information from a database and display that data.  Even though ColdFusion has changed so much over the years, it’s still very simple to connect to a database, retrieve data and display that data.  This is what we will accomplish in this article.

In this article, we’re going to work with ColdFusion MX and explore the following tasks:

  • Deciding on the database: MySQL 4.1.8 & MySQL Administrator (for Windows)
  • Installing MySQL and MySQL Administrator
  • Setting up the Database
  • Creating the Data Source Name (DSN)
  • Querying a Database Table
    • Basic Select Statement
    • Using the CFDump tag
    • Dreamweaver Recordset Builder
    • Understanding the Result Set
  • Displaying Database Data
  • Dynamic Table Tool
  • Additional Query Information

These are the basic tasks necessary to setting up a database for use and then writing ColdFusion code to query that database and display data.  You will see some insight into the dot notation that is being used in ColdFusion as well as additional information about MySQL and recordsets.

Read More

Creating a blog part two

This article is the second in a series of articles which discuss how to create your own blog using software available for download. In the last article I explained how to download and install the popular, free, blog system “Wordpress”, and by the end of the article we had a running installation of Wordpress using its default template.


In this article I will be discussing how to create your own template for a blog. I will be using Wordpress as my example however the techniques used here could just as easily be applied to another blog with a similar templating system, and while this is a follow-up to the first article it could be followed as a standalone article if you already have blog software such as Wordpress installed and want to know how to create your own templates for your blog.

Read More

Creating a web poll in Flash MX 2004 part 4

Welcome to the last tutorial in this series on Creating a web poll in Flash MX 2004. The tutorials have worked with a simple Web poll application. We started by looking at how we could use various data sources for our application – text and XML files and a database. We used functions written in AS2.0 to populate the application, record the vote and display a chart of all responses.

In the third tutorial we created two custom classes for our Web poll application. By the end of that tutorial, we had populated the application with information from a database. This tutorial extends the classes to record the vote and display a simple chart of responses.

As with the last tutorial, you'll need some kind of web server and a server-side language like PHP, Cold Fusion, ASP or ASP.NET. The examples in this tutorial use VB.NET, as I'm an ASP.NET developer. My own computer is set up to use IIS 5 as the Web server and it has the .NET 1.1 framework installed.

You can download the files for this tutorial from the blue Properties box that contains the article PDF. There's a heading titled Code Download and you can click the Details link next to it to get the zip file. It contains the source files you'll need for the tutorial as well as the completed files.

You can either start with the class files from the previous tutorial - Poll.as and PollResponse.as – or use the files provided in the resources zip file. Open these files in Flash as well as the file pollclasses2.fla. Just make sure you don't use the files from the completed folder.

Copy all the files to your Web server – in my case, I created a folder called poll in Inetpub >wwwroot. Open and test the file pollclasses2.fla and you should see the interface populated from the database.

Read More

ColdFusion MX Installation and Basic Testing

“ColdFusion” (all one word) is server-side processing software made by Macromedia that allows developers to write rapid developed, database driven applications through a tag-based syntax language.  “Cold Fusion” (two words) is the dream for a renewable, safer energy source.   

In this article, we’re going to work with ColdFusion MX and perform the following tasks:

·         Install ColdFusion MX (free Developer Edition)
·         Review the ColdFusion Administrator
·         Setting up a ColdFusion MX site in Dreamweaver MX 2004
·         Creating ColdFusion variables
·         Displaying ColdFusion variables
·         Use ColdFusion Functions
·         Commenting your code

These are the basic tasks necessary to set-up your working development environment for future work as well as learn some basic ColdFusion skills.

Read More
Newer articles Older articles