Fireworks Basics: From Navigation Graphic to Stretchy Table
This article was originally published, as a set of three, on Joyce's personal web site, where Joyce has tutorials, reviews and resources to help the new Web developer develop their skills.
![]()
![]()
![]()
Fireworks Basics: From Navigation Graphic to Stretchy Table
This article was originally published as a set of three on Joyce's personal web site, where Joyce has tutorials, reviews and resources to help the new Web developer develop their skills.
In this tutorial we'll be getting to grips with Fireworks to firstly create a curved graphic suitable for use as a navigation background. This will encompass not only creation of the graphic but also appropriate manipulation. We'll then extend the work by looking at how to use our graphic inside a stretchy table that we build using Dreamweaver.
Curved Navigation Graphic
The first part of this tutorial is to show you how to make a top and side navigation graphic with a curve on the inside.
1. Choose File|New and use a size of 700X400 and a white canvas color.
2. Select the Rectangle tool and drag on the canvas to draw a rectangle.
3. In the Property inspector change the width to 700 and the height to 120. I'm using a shade of blue.
4. Draw another rectangle and make its width 120 and height 400. I'm using green so you can see better what I'm doing.
5. Place the rectangles together to form an upside down L shape.
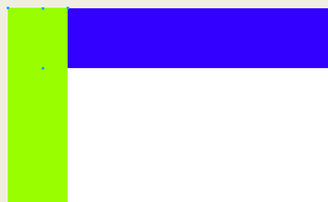
6. Shift+select both rectangles.
7. Choose Modify|Combine Paths|Union.
The shape is now one shape instead of two.

8. Select the Rounded Rectangle tool (press and hold the little arrow next to the Rectangle tool to access).
9. In the Property inspector change the Edge setting to 50, the width to 650 and the height to 400.
I made mine gold so you could see it easier, any color will work.
10. Position the rounded rectangle into the corner of the L shape.
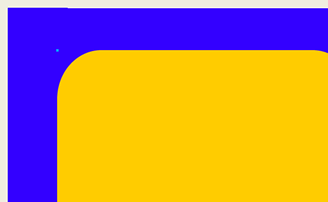
Note: Be sure that the curve of the rounded rectangle clears the end of top of the shape and the bottom of the side shape. Otherwise you won't get a nice straight edge. If it doesn't, make your rounded rectangle larger.
11. Shift+select the L shape and the rounded rectangle.
12. Choose Modify|Combine Paths|Punch.
You now have an L shape with a curved inside corner.

13. In the Property inspector, click the plus sign next to the word Effects and select Shadow and Glow|Drop Shadow. Change the Distance to 10 and the Opacity to 50%.
14. Press Enter (Return) to activate the change.
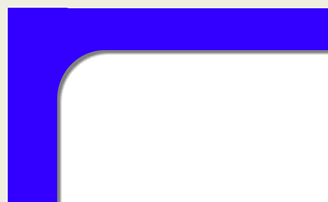
15. Save your file.
Our next step is to consider slicing, optimizing and exporting this image,
![]()
![]()
![]()
Joyce Evans
 Joyce J. Evans Joyce is a training veteran with over 14 years of experience in educational teaching, tutorial development, and Web design. She has been asked to speak at conferences such as Macromedia MAX, TODCON, DESIGN FEST and SEYBOLD.
Joyce has received Editors Choice Awards for her book Fireworks 4 F/X and Design and has authored over 10 books on Fireworks, Dreamweaver and Web Design. Her current offering is a CD "Web Page in a Day" which teaches you how to build a site start to finish.
Joyce was a Team Macromedia Volunteer and now an Adobe Community Professional.
She can be reached at mailto:Joyce@JoyceJEvans.com. Her Web site is http://www.JoyceJEvans.com and Idea Design
Joyce lives with her husband, teenage son and daughter, dog, cat and horse, in the Tampa Bay area in Florida. When Joyce isn't working she can be found enjoying the many fruit trees and palms in her yard or at the beach.