In our previous tutorial you learned how to create a complete log-in system using users table from your database.
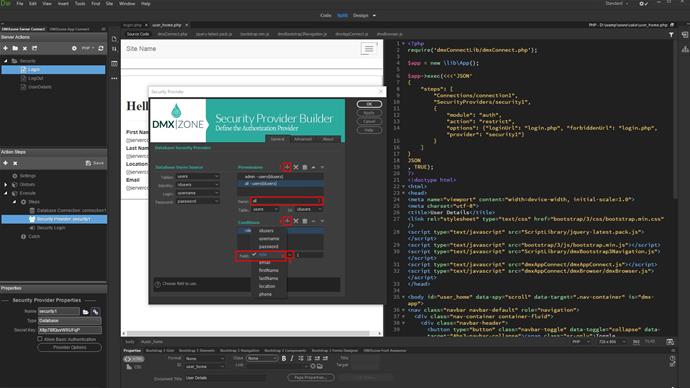
Open the log-in server action (1). Click your security provider and open its settings (2-3). Click the add new button in order to create a new permission (4). Add a name for it. We called this permission admin. We will assign users which role is admin to this permission (5). Select your database table containing the roles and select the identity column. In our case it's the same table as our users table (6). Add a condition for this permission (7). We select the role column from our database table (8-9). Then we set the operator to "equals to" (10).


Enter the role you'd like to assign here. In our case, we entered admin.

We are now done setting up the admin permission. Only users which role in the database is set to admin, are included in this permission level.
Now, let's add a permission level which includes several user roles. We called it "all" (1-2). Setup the conditions for it (3). Again, we selected the role field from our database table (4). For the multiple user roles, we selected the "in" operator (5).


We entered a comma separated list of user roles, each wrapped in single quotes. This way, you can create as many permission levels as you need and you can assign multiple users to them, using the "in" operator (1). Click OK, when you're done (2). Save the server action (3).

Now, you can apply different permission levels to different pages, so only users having the required permission can access them. Click site (1). Open the DMXzone security provider menu and select security provider enforcer (2-3).

Select your security provider from the drop-down (1). Select the required permission level for this page. We select the admin permission level. So only users in this group will have access to the page (2). Setup the redirect URL for the unauthorized users and click OK (3-4).

And we're done!
That's how easy it is to setup user permissions for your site using DMXzone Security Provider.


